Toolbox/Raidplan
Toolboxes are an interactive guide that allows you to click through each phase indiviudally and review the mechanics in a easy to understand manner.
Archive
The following strats are archived and only kept for ongoing groups, new groups are suggested to use the strats above.
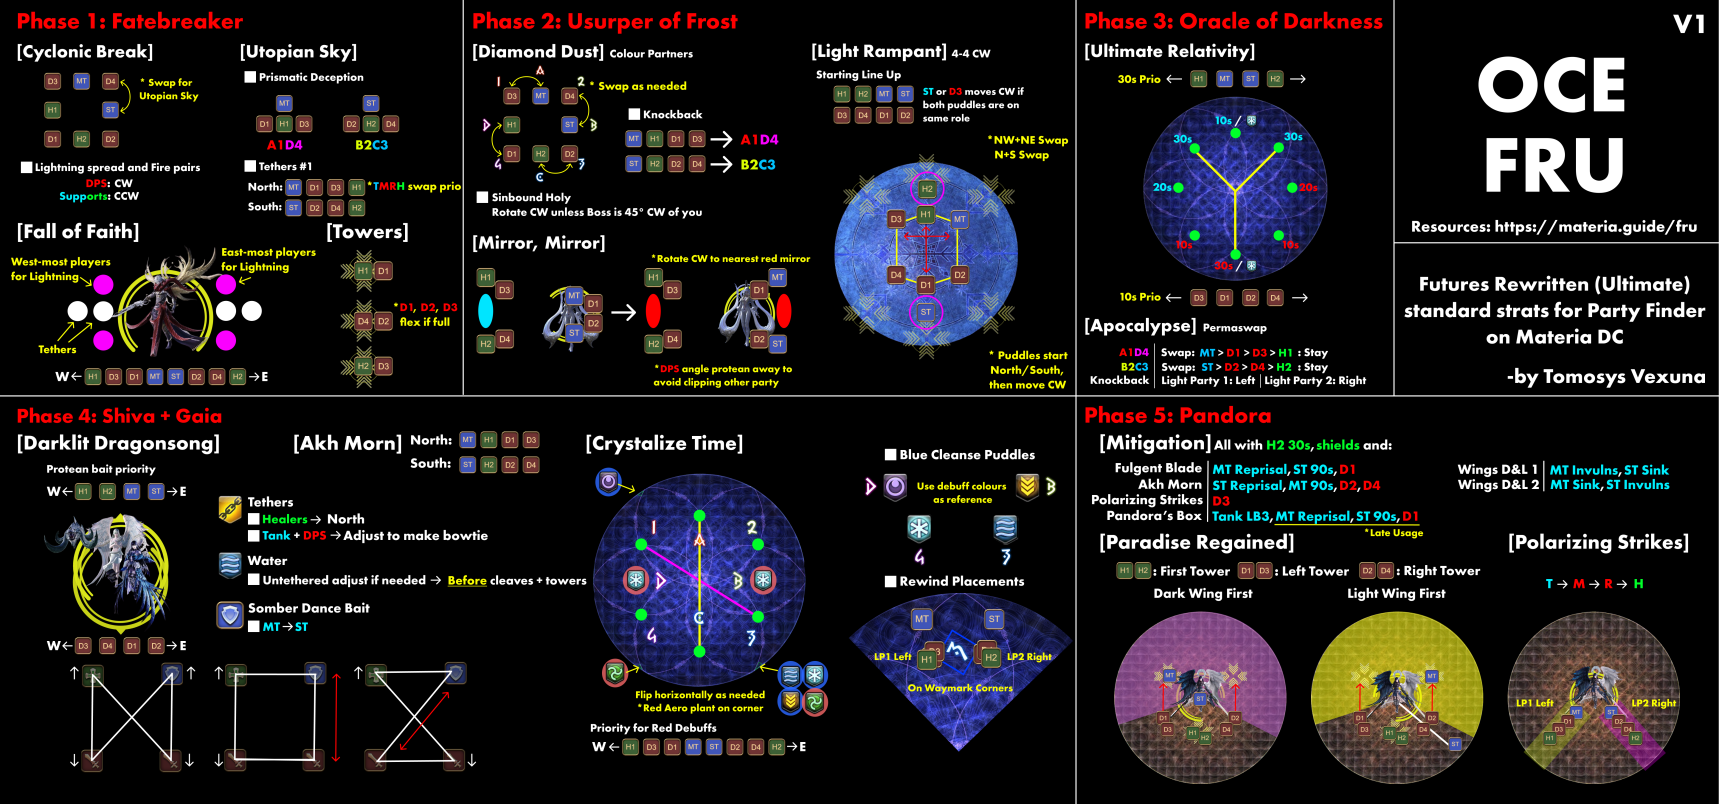
Strat Summary
Quick summary of strats for MUR:
Base Spreads:
D3 MT D4
H1 *  ST
D1 H2 D2

P1: Tether 1 LP1 north/LP2 south | TMRH swap prio

P2: DD Colour Partners
Mirror Mirror: Supports Far | DPS Close
4:4 LR North H1H2MTST
       South D3D4D1D2

P3: LP Apoc (non-fixed spreads): H1D3D1MTSTD2D4H2 Prio

P4: Darklit lineup same as LR but intercard pairs
North H1H2 MTST
South D3D4 D1D2
Hourglass = Left DPS+Tank Swap - Box = Right DPS+Tank Swap
Tank invuln Somber, invuln prio WAR>DRK>GNB NO PLD
LP1 North LP2 South Akh Morn

P4: CT Red Debuff Lineup: H1D3D1MTSTD2D4H2 Prio
Fast Dragons
STACK - B
WATER - 3
DARK - D
ICE - 4

P5: Polarizing Swap Order: TMRH
Cheatsheet
Video Guides
Expand for Video Guides by Kobe
PoV Videos
PoV Videos provided by Materia Ultimate Raiding
Mitigation Plan
By Ikuya Kirishima
IMPORTANT
The mit sheets is NOT intended to be taken as gospel, but rather a general guideline to how you can set up your CDs through the fight. Talk with your party and work out what CD timings you are using together.
Waymarks
These can be imported using an XIV Launcher Plugin.
{"Name":"cardinal exalines, intercard dragon & rewinds 1A","MapID":1006,"A":{"X":100.0,"Y":0.0,"Z":93.0,"ID":0,"Active":true},"B":{"X":107.0,"Y":0.0,"Z":100.0,"ID":1,"Active":true},"C":{"X":100.0,"Y":0.0,"Z":107.0,"ID":2,"Active":true},"D":{"X":93.0,"Y":0.0,"Z":100.0,"ID":3,"Active":true},"One":{"X":91.575,"Y":0.0,"Z":91.575,"ID":4,"Active":true},"Two":{"X":108.425,"Y":0.0,"Z":91.575,"ID":5,"Active":true},"Three":{"X":108.425,"Y":0.0,"Z":108.425,"ID":6,"Active":true},"Four":{"X":91.575,"Y":0.0,"Z":108.425,"ID":7,"Active":true}}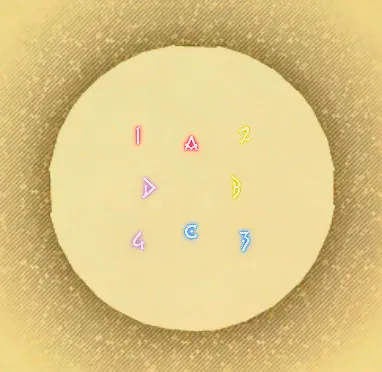
Buff Timings
- P1 Opener
- P1 After Tether 2
- P2 Mirror Mirror
- Intermission
- P3 After Ultimate Relativity
- P4 Darklit when Gaia Spawns
- P5 Start
- P5 Second Exas
- P5 End
- P1 Opener (or P2 if excess damage)
- Intermission (or P3 if excess damage)
- P4 Darklit when Gaia Spawns
- P5 Second Exas
Written Guide
Phase 1: Fatebreaker
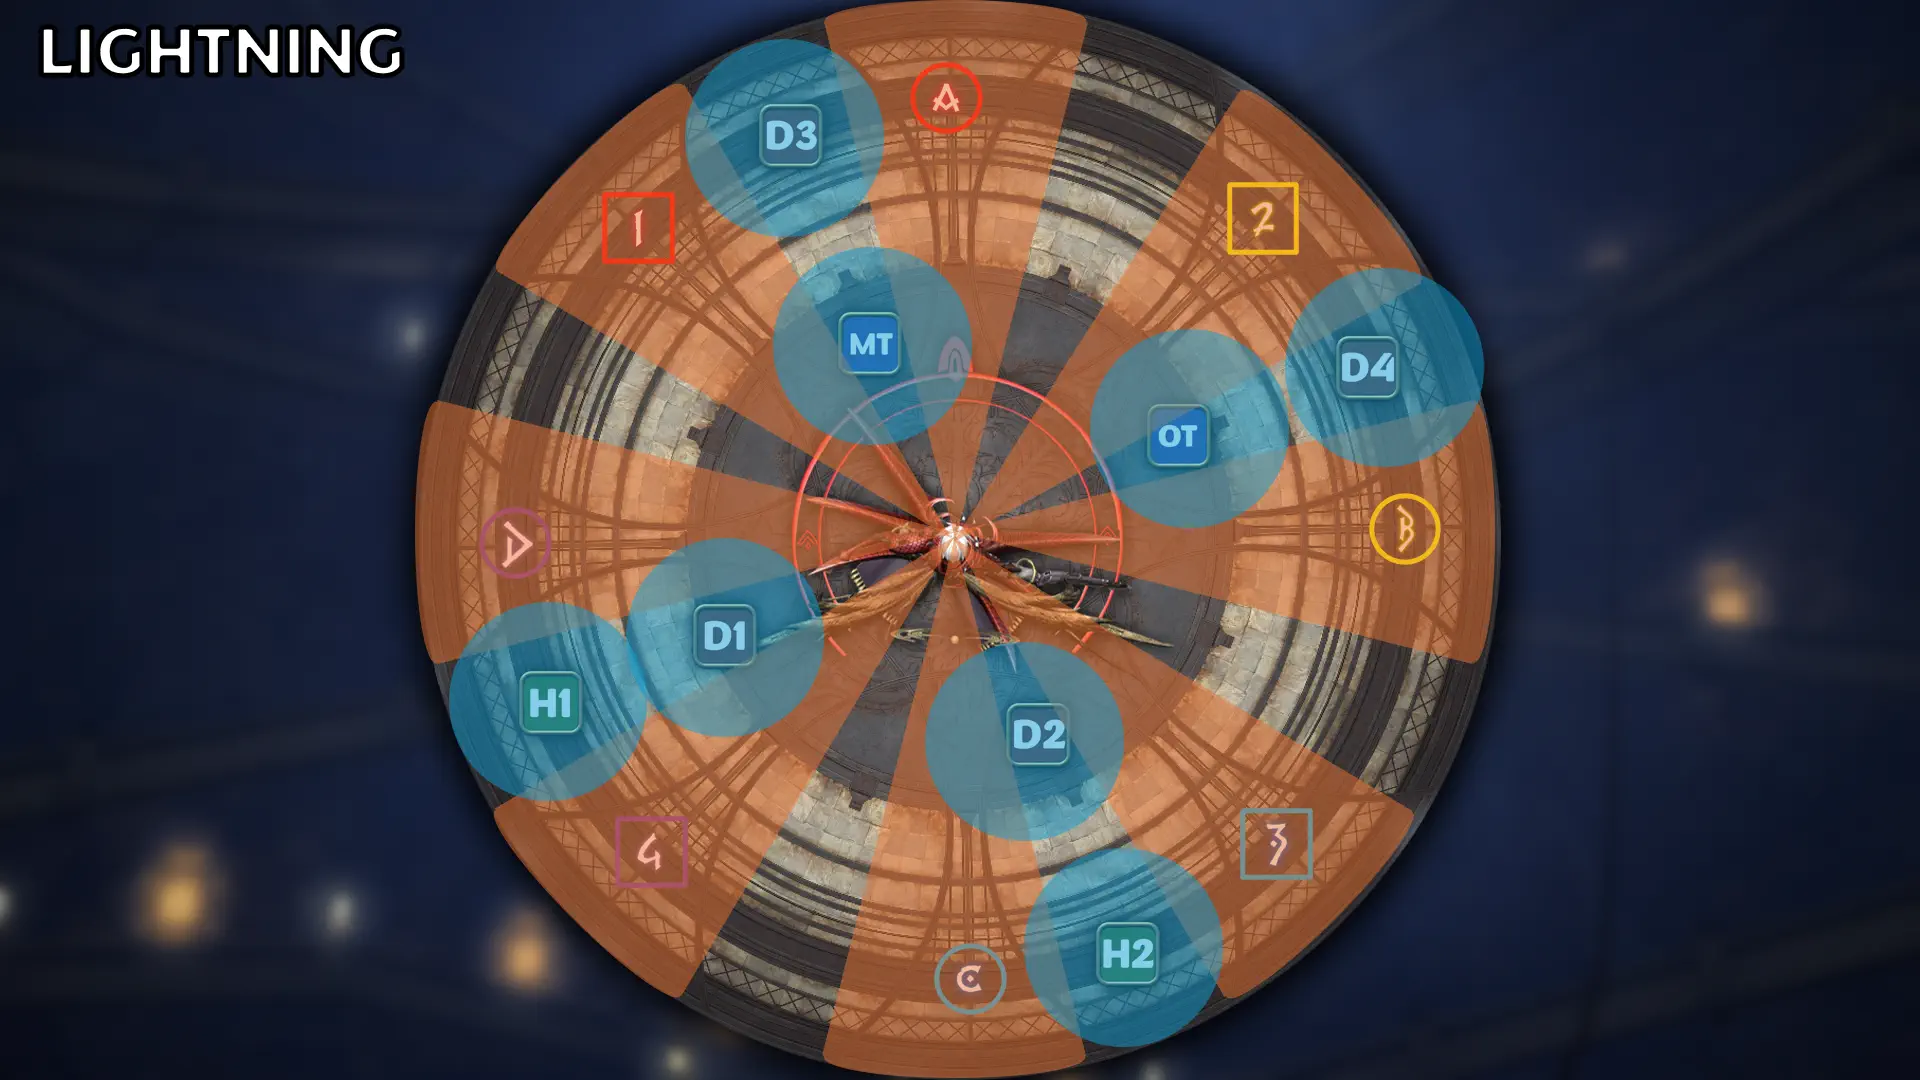
P1 - Proteans & Utopian SkyThroughout this phase Fatebreaker will aspect his abilities with either Fire or Lightning.
Fire Cyclonic Break : Role-based partner stack.
Lightning Cyclonic Break : Large spread AOEs on each player.
Fire Burnt Strike : Very strong knockback after the initial hit.
Lightning Burnt Strike : Line AOE expanding to 2x it's width after the initial hit.
After a few heavy hitting auto attacks, Fatebreaker will cast Cyclonic Break which will target each player with proteans. These proteans will repeat in the position they are baited, and then alternate to the previous safe spot twice.
For Fire Aspected Cyclonic Break, each player will rotate into a pair stack, then alternating between proteans.
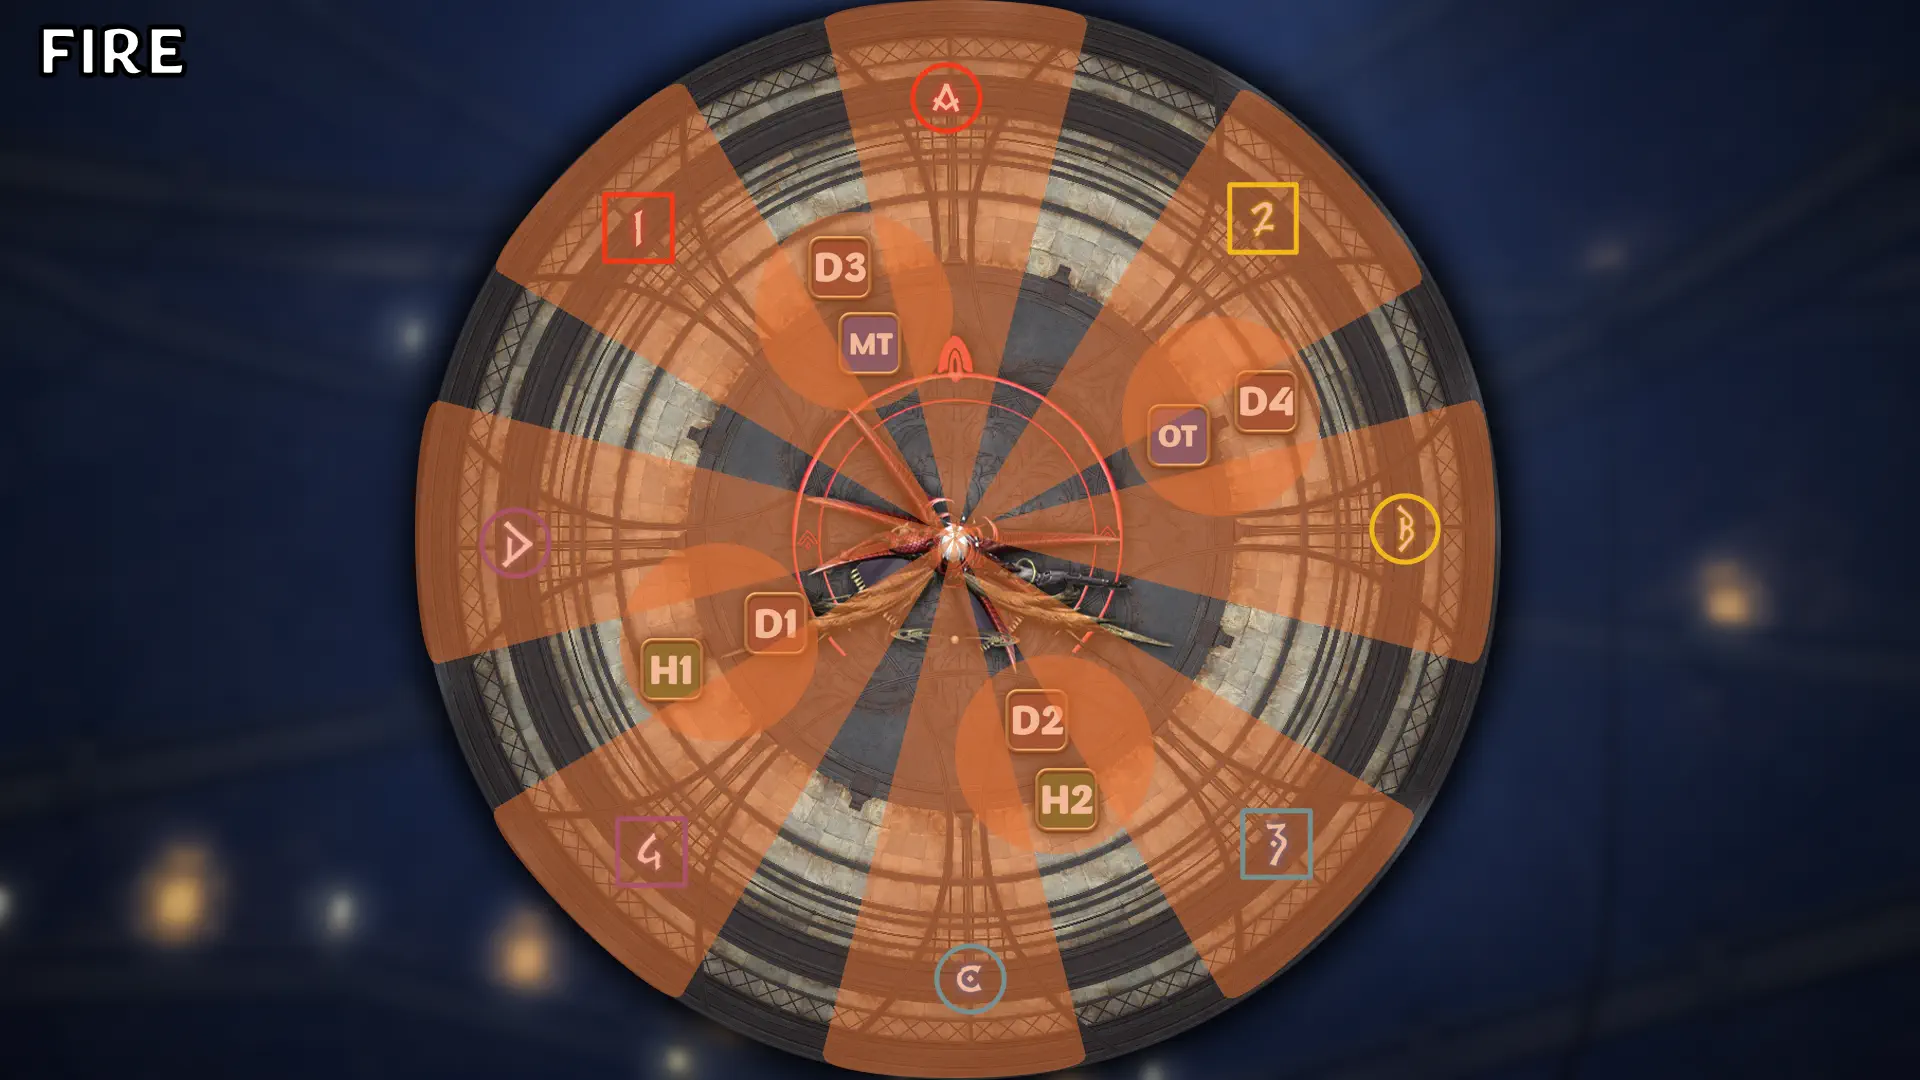
For Lightning Aspected Cyclonic Break each player will move into the same proteans but with ranged behind the melee for spreads, then alternate between proteans.
After this resolves, Fatebreaker will cast Powder Mark Trail, hitting the MT with a heavy tankbuster and marking them with a 15s debuff of the same name.
Once this debuff falls off, the marked player and the closest ally to them will take a small circular AOE tankbuster.
After the initial hit of Powder Mark Trail, Fatebreaker will cast the trio of this phase:
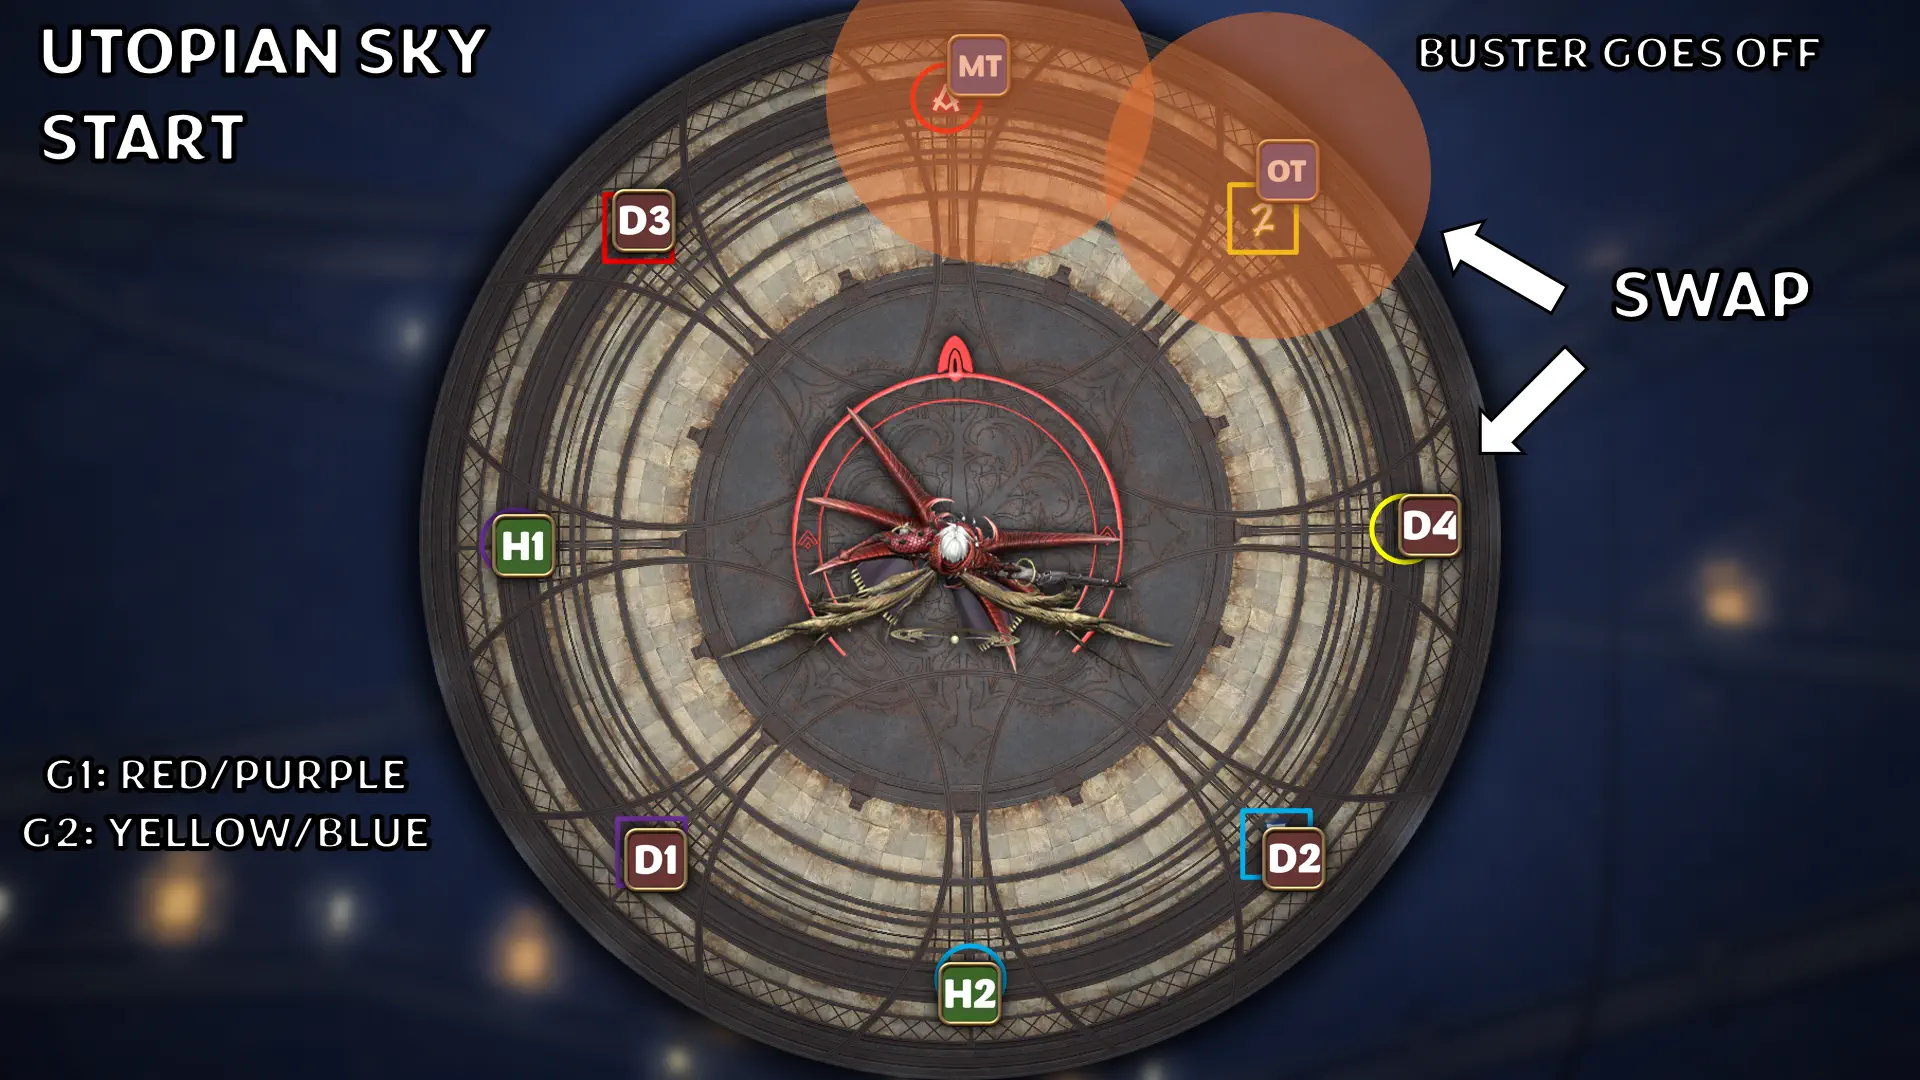
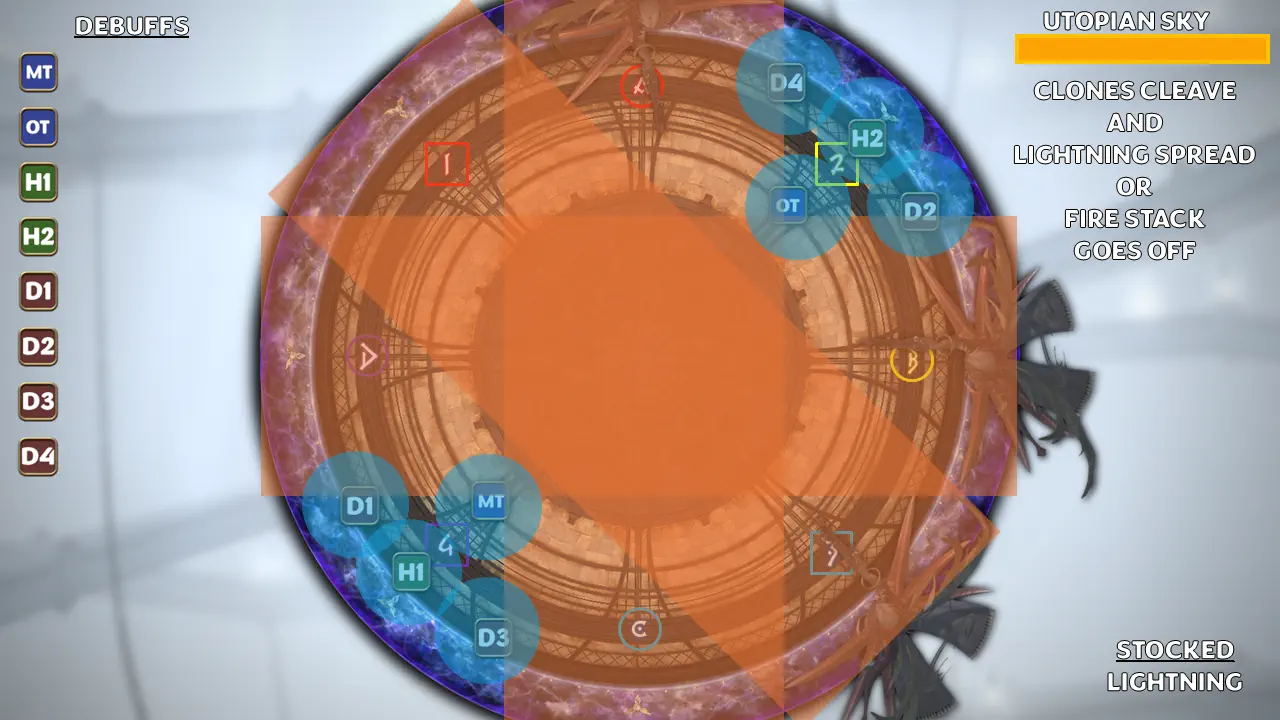
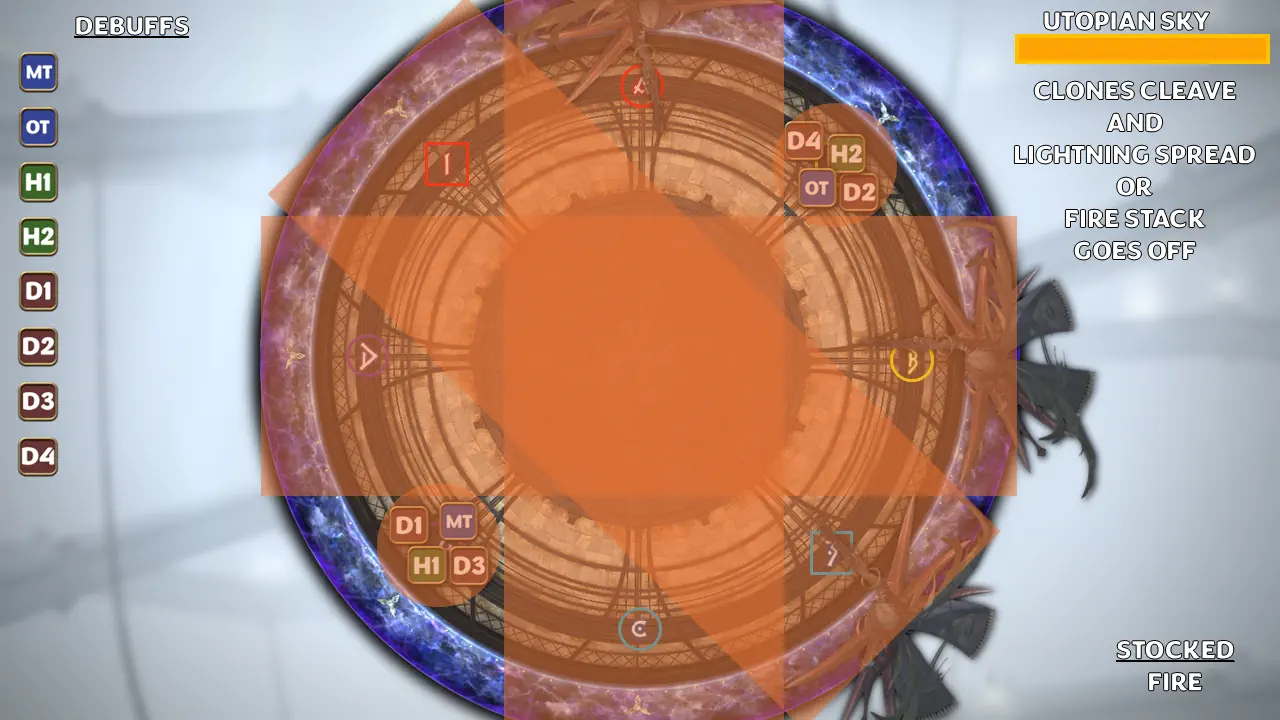
Utopian Sky
This mechanic can be Fire or Lightning aspected. Fire will result in 2 light party stacks targeted on each healer, and Lightning will result in large AOEs on each player.
Fatebreaker will go untargetable and jump away as fog fills the arena. Party members will spread to the wall in protean positions with ST and D4 swapped. ST and MT will resolve their Powder Mark by moving slightly closer together at the wall.
While at the wall, 3 random clones will raise their arms, indicating they will cleave through the arena.
Because only the players who are next to these clones can see them, if a player sees a raised arm they will walk to the middle of the arena.
If the person opposite you walks in, you must walk in as well, even if your clone has a lowered arm.
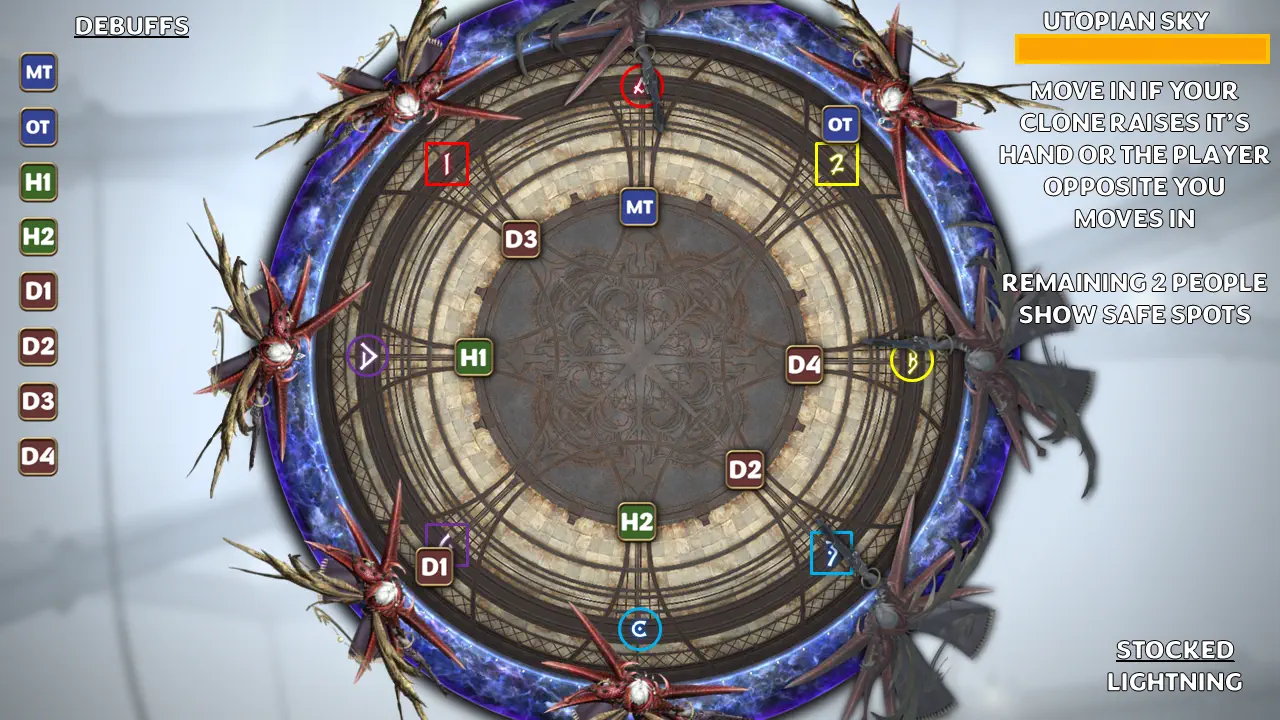
This will result in 2 people remaining on the wall and subsequently form a small triangular safe spot.
Light party 1 will take any safe spot from SW - N
Light party 2 will take any safe spot from NE - S
After arriving at the safespot, the party will either stack or spread. The spread can be seen in the image below. The DPS can move 3.5 notches from the star on the arena edge to determine a safe distance from the healer.
Tethers 1
After the spreads or stacks resolve, Fatebreaker will drop into the middle of the room untargetable and begin to cast another aspected Cyclonic Break. Another Lightning Aspected Fatebreaker clone will spawn on the West of the arena casting Burnt Strike. As the proteans resolve, another clone will spawn in the middle of the arena that is either Fire or Lightning Aspected. What is NOT aspected here will be the safespot in the upcoming mechanic.
Immediately following the Cyclonic Break, players will either move North or South to avoid the Burnt Strike.
So far, I've seen light party 1 move north, and light party 2 move south to make the adjust for tethers easier (this may change due to movement for D1/D4 but also downtime lmao)
Once the partner stack/spread is resolved it is possible to make your way North/South while dodging proteans.
To the north, a Fire Aspected clone will begin to cast Burnt Strike. At the same time, two random players will be targeted for light party stacks via a Bound of Faith cast.
Light party 1 will move slightly to the north, and Light party 2 will move slightly to the south. If a swap is required, the priority for the tether that is swapping light party is TMRH. The opposite melee TANK will always flex across to match this movement.
Using the knock back from Burnt Strike, each party will be knocked North-East/West and South-East/West depending on where the safespot is.

If these light parties are not an even 4/4 split, players will be hit with a heavy damage down.
Fatebreaker will then appear in the center of the arena and cast "Burnished Glory", a hard hitting raidwide with a bleed attached.
Following this, Fatebreaker casts:
Fall of Faith / Tethers 2
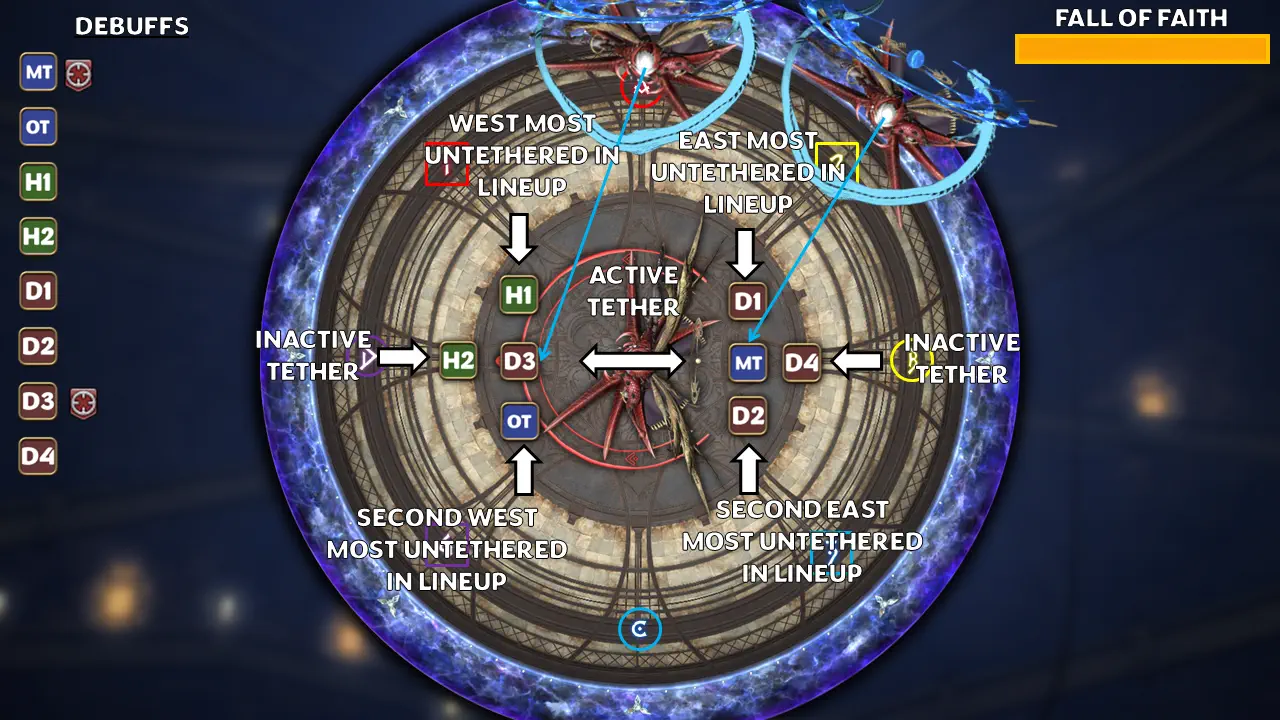
P1 - Tethers 2 East/WestFatebreaker will begin the mechanic by targeting a random player with either a Fire Aspected or Lightning Aspected Fall of Faith.
3 clones will spawn from NW to NE, each one tethering a new player with Fire/Lightning.
All the tethers here are randomized. It is entirely possible to get all one colour.
These tethers are slightly different to the previous Bound of Faith mechanics in that Fire tethers will launch a large conal light party stack at the nearest player, whilst Lightning tethers will launch 3 large conal AOEs on the nearest players.
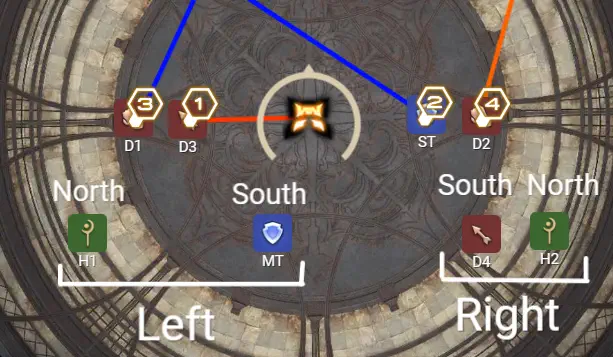
To resolve this, the party will line up south of Fatebreaker. As the tethers are placed, the 1st and 3rd tether will go to the West of Fatebreaker, and 2nd and 4th tether will go to the East of Fatebreaker.
The 1st and 2nd tethers will start by placing themselves on the hitbox of the boss, with the 3rd and 4th tethers slightly outside the hitbox in front of them.
The remaining 4 non-tether players will split evenly so West/East both have 4 players.
The two most west players will move to the west group and the two most east players will move to the east group.
As the tethers begin to resolve, players need to pay attention to whether it is a fire of a lightning tether to be in the correct position.
TIP
Because the tether colour disappears quickly on the first tether, it can be useful to commit this one to memory.
Once a tether goes off on each side, the tethered players should swap positions.
After another Burnished Glory, Fatebreaker will do another Powder Mark  tankbuster before casting the final mechanic:
Burnt Strike / Enum Towers
P1 - Towers - StaticFatebreaker will begin to channel Burnt Strike, and 3 towers will appear on the West or East wall. These towers will require 6 members from the team to soak them, with a maximum of 4 players in one tower.
From North to South, players will pair up in the towers in the order: H1/D1 - D4/D2 - H2/D3.
If a tower only has one pillar, then the D1/D2/D3 will move to the next available tower from North to South.
If Burnt Strike is Fire Aspected, players will ride the knockback into their respective tower.
If Burnt Strike is Lightning Aspected, players can simply step out into their tower immediately.
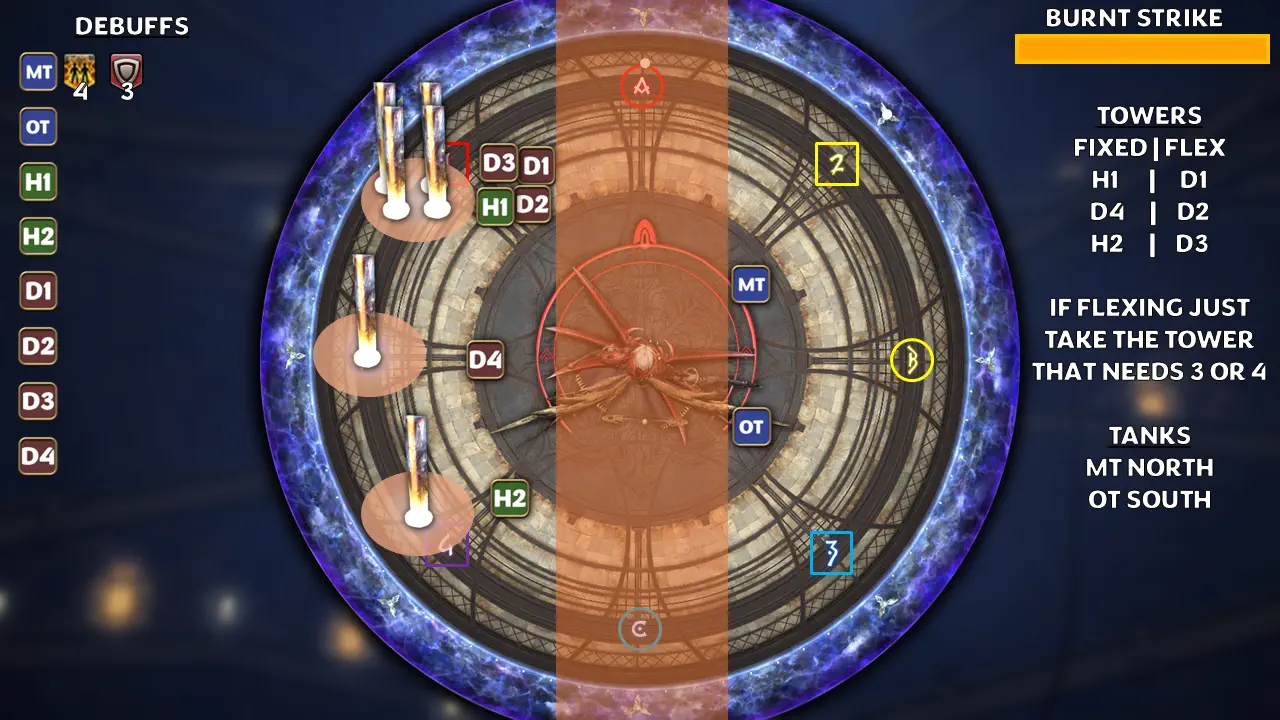
Whilst this is happening, the tanks will be utilising the opposite half of the arena to resolve their Powder Mark debuff in the same manner as the previous tankbusters.
Finally, Fatebreaker will cast his enrage:
Burnished Glory
Phase 2: Usurper of Frost (Shiva)
Phase 2 begins with a tankbuster Quadruple Slap, before starting the first major mechanic:
Diamond Dust
P2 - Diamond Dust - Colour Partners(Work in progress guide for Colour Partners)
After spawning a clone of herself, and flashbanging your monitor, Shiva will rise into the air and spawn 2 large AOEs opposite each other on the edge of the arena. (clarification on clone here)
These will be followed by another 6 AOEs that fill the edge of the arena but only the first 2 are important and the rest can be ignored.
Either DPS or Supports will then be marked by 4 orange Frigid Stone AOEs that will spawn a star shaped AOE after a delay. Theses AOEs should always be placed on intercardinals when facing relative North.
Our goal in this mechanic is to place these AOE markers in specific positions such that we form safe spots within the first 2 AOEs
Shiva will then cast 1 of 2 abilities:
Axe Kick/Cleave: Shiva will do a large AOE, reaching to the outside ring of the arena.
Scythe Kick/Reap: Shiva will do a small donut AOE, the safespot being halfway between the centre and the innermost ring.
(images for both)
Because the AOEs are role based we use our Phase 1 protean spread to form ranged/melee partners for the following resolutions:
Axe Kick
For Axe Kick, Shiva will begin by shouting "Cleave". Players will move out to their coloured quadrant.
The non-AOE players will stand just outside the outer ring on the arena floor to bait out proximity based protean AOEs. Leaning slightly towards the relative cardinal marker may help with clipping the AOE player. Meanwhile, AOE players should move as far out as they can and place their AOEs on their colour waymark closest to the first 2 AOEs.
INFO
Sometimes as a protean player, your colour waymark may be inside one of the first 2 AOEs. Even though it isn't necessary, for the sake of safety it is okay to move to the opposite side to bait your protean into the open area either side of the AOE.
Scythe Kick
For Scythe Kick, Shiva will begin by shouting "Reap". Players will find their waymark and immediately move into the positions as shown in the image below.
(image)
The non-AOE players will stand as close as possible to Shiva. It is possible to use the small diamond shapes on the floor to align yourself. The AOE players must also start extremely close to Shiva as the donut AOE is tiny (The inner ring is NOT the safe spot; it is actually about half the diameter of that ring). After the initial cleave goes off, all the AOE players will quickly move out and place their AOE on the middle ring on the Arena's floor.
After dropping their puddles, everyone will quickly rush back to the centre of the arena. Shiva will shortly do a knockback and Light Party 1 will ride this to the safe spot with a Red or Purple waymark in it, and Light Party 2 will ride this KB to the safe spot with a Yellow or Blue waymark in it.
TIP
Moving slightly closer to the wall after your KB can help alleviate some poor AOE placement.
Stillness/Silence
P2 - Silence/StillnessJust after the AOEs are dropped, players should identify where the clone of Shiva is (she'll be wearing a white outfit instead of Shiva's blueish armour), as this is where real Shiva will be later.
Each light party will be taking stacks that leave a bleed puddle. We want both light parties to leave these puddles in desirable positions, and set up each party for favourable movement in the upcoming mechanic.
After identifying the clone:
Lightparties will rotate clockwise along the edge of the arena whilst dropping their puddles.
Light parties will always rotate CW along the wall UNLESS the Shiva clone is directly 45 Degrees CW of your starting position, in which case your light party will rotate CCW.
After dropping 4 puddles, the Shiva clone (outside the arena) will cast Redress, requiring each player to look away less they be stunned.
TIP
There is a short period where you finish dropping your puddles and can move before the gaze goes off, allowing you to either get behind or directly across from the Shiva clone.
This redress will swap both the real Shiva and the clone, as well as covering the floor with ice.
This ice will slide you across nearly the entire width of the arena in one movement, so players should position close to the arenas edge to avoid walling themselves.
Shiva will then cast either:
Twin Stillness and say, "In Stillness, freeze", which is a 270 degree cleave that covers the entire arena in front of her.
OR
Twin Silence and say, "Sink into Silence", which is a small cleave that covers the wedge of arena behind her.
Immediately after she will cast the opposite, requiring players to slide across the arena into the opposite safe spot.
WARNING
This snapshot for the second cleave is INCREDIBLY unforgiving. I recommend watching your enmity list and sliding the second you see the first cast finish.
TIP
Some patterns may require a Light Party to move faster to get behind Shiva.
Immediately following this Shiva will become targetable, appearing back in the arena's centre and the ice floor will disappear.
She will then cast a heavy hitting line stack, Hallowed Ray, before casting:
Mirror Mirror
P2 - Mirror MirrorShiva will spawn 3 mirrors along the edges of the arena. There will be 2 RED mirrors and 1 BLUE mirror.
During this mechanic, every mirror will repeat the mechanics that Shiva is doing, however red mirrors will do it after a significant delay.
The MT will start by pulling the boss across the arena from the blue mirror. Melee DPS and both tanks will stick close to the boss, whilst the healers and ranged players will step out next to the blue mirror.
Shiva will then cast Scythe Kick, requiring the melees to be close to the boss, and the ranged players being close to the blue mirror.
As this cast goes off, 4 proximity based AOEs will launch at the players closest to the source (Shiva/Mirror). Ranged players should be careful with pointing their protean directly through the middle as they will cleave the melees.
The lineup for these AOEs can be seen below:
Immediately after, the MT will pull the boss to the closest red mirror to the boss, and the ranged will move to the closest red mirror to the blue mirror, and everyone will spread for another Scythe Kick + Protean combo.
In the case that the mirrors spawn: RED, BLUE, RED, the melees will move to the first red mirror clockwise of their position. The ranged players will also rotate to the first red mirror clockwise.
All players but specifically the DPS players should be careful with their proteans here. In some patterns it's possible to be 90 degrees from the other red mirror, meaning that the DPS should squeeze closer to the Support player the furthest away from the other mirror to ensure no clipping occurs.
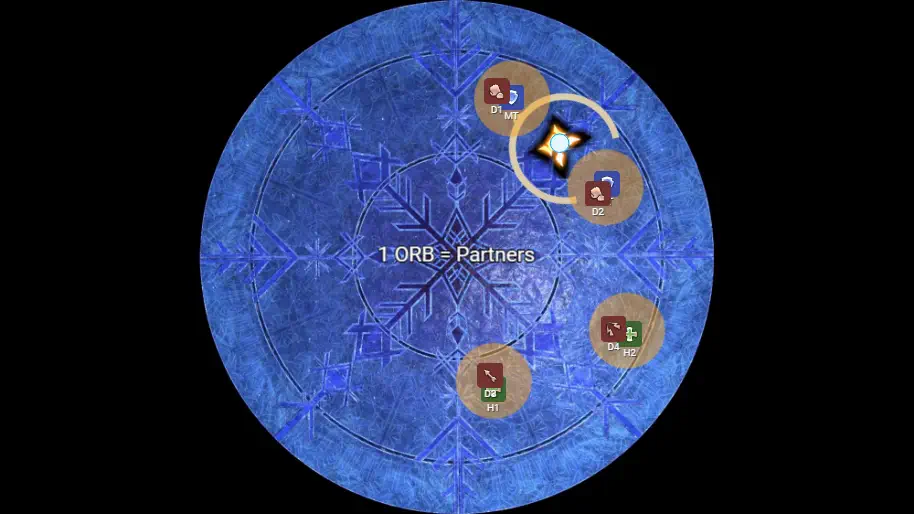
After this mechanic resolves the mirrors will despawn and Shiva will cast Banish III, forming a halo on her head.
If this halo has 1 orb, the party must group up in pairs as seen in the image below:
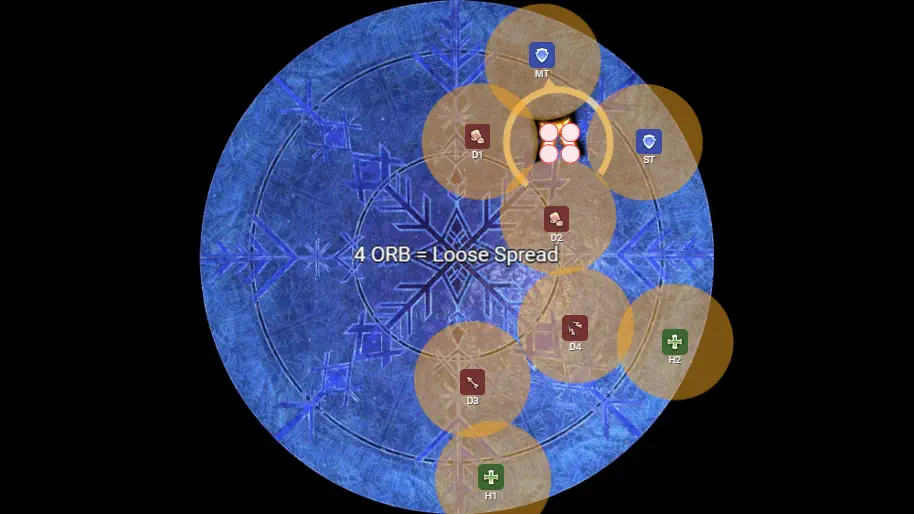
If this halo has 4 orbs, the party must spread as seen in the image below:
Shiva will then cast:
Light Rampant
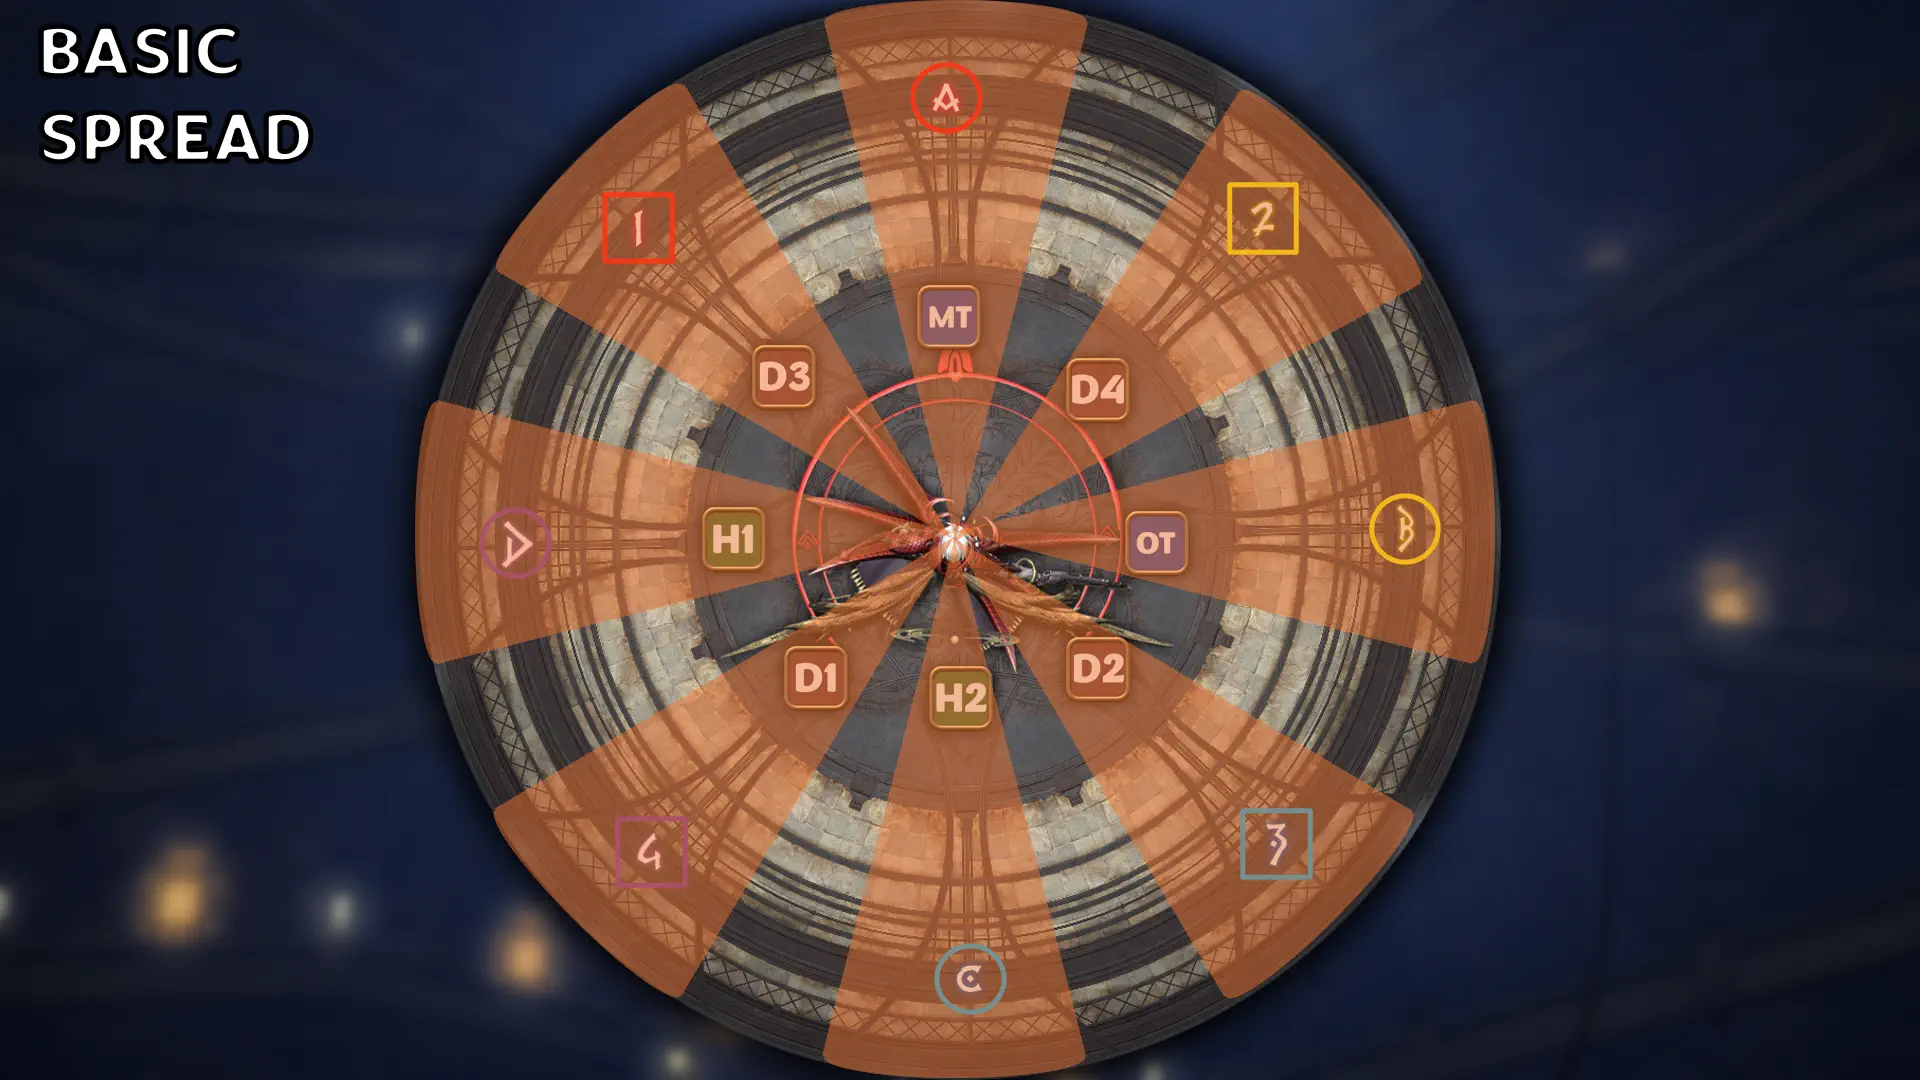
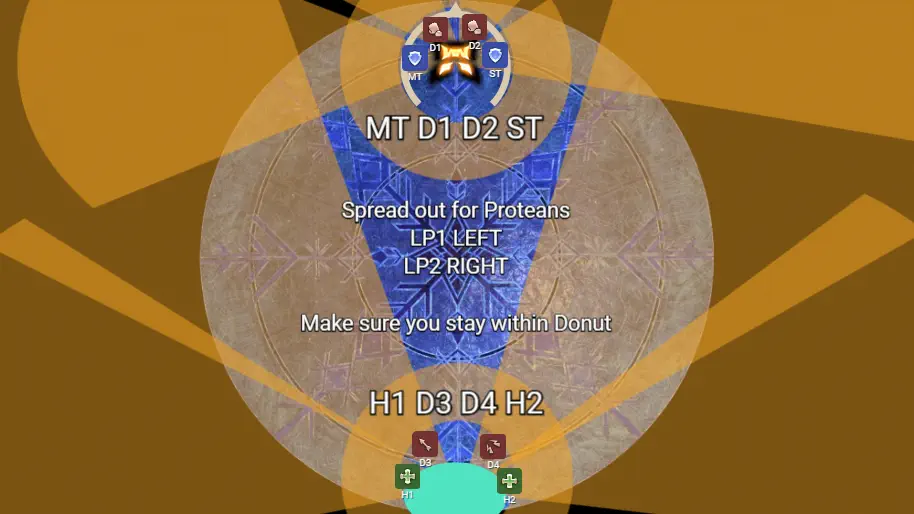
P2 - Light Rampant - 4/4 StratShiva will go untargetable, and the party should line up as seen in the image below, with DPS south and Supports north. Shortly after the cast finishes, 6 players will be tethered together with 2 of them having large white orbs above their heads, signifying they are being targeted for a light party stack later.

These tethers will explode if the distance between two players is too short, so they must be stretched to an adequate distance (close to 80-90% of the arena length) to satisfy the mechanic. The 2 remaining players will be targeted with AOEs marks similar to the puddles in Stillness/Silence. At the same time, 6 towers will appear around the arena.
Players must quickly form a hexagon shape, using the 3 North waymarks and the 3 South waymarks. Some players (D1/H2) may have to walk to the opposite cardinal to form the hexagon.
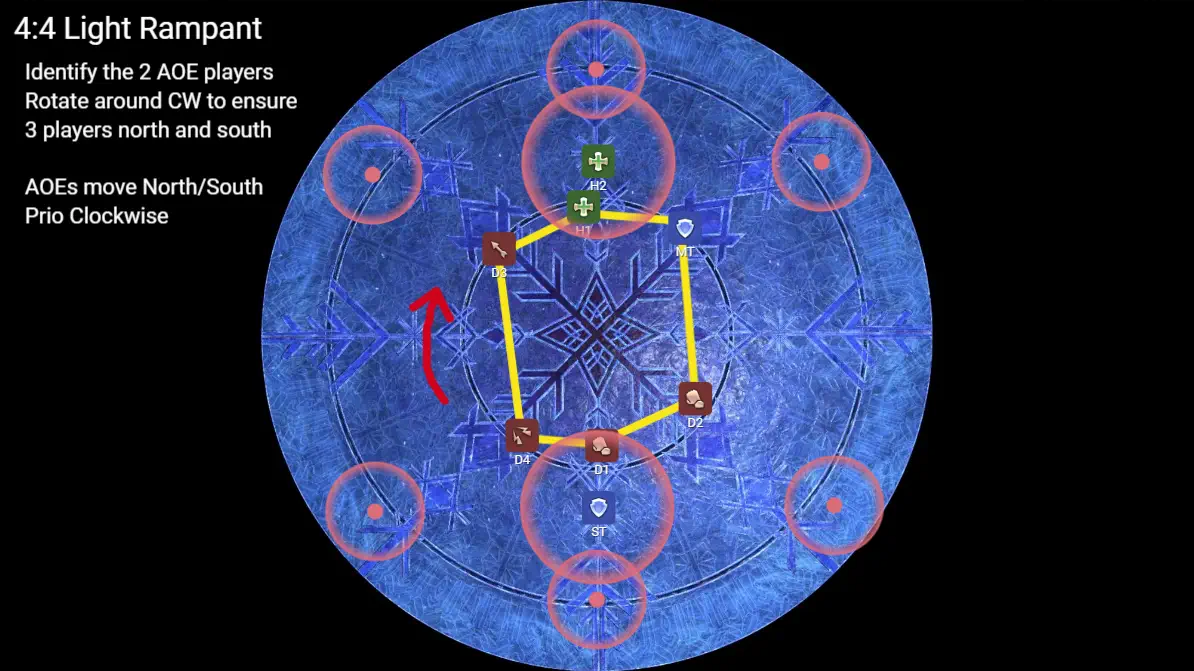
The N/S players will then swap positions, and the NE/NW players will also swap positions. All the tether players will then quickly spread out to the tower on their cardinal/intercardinal.
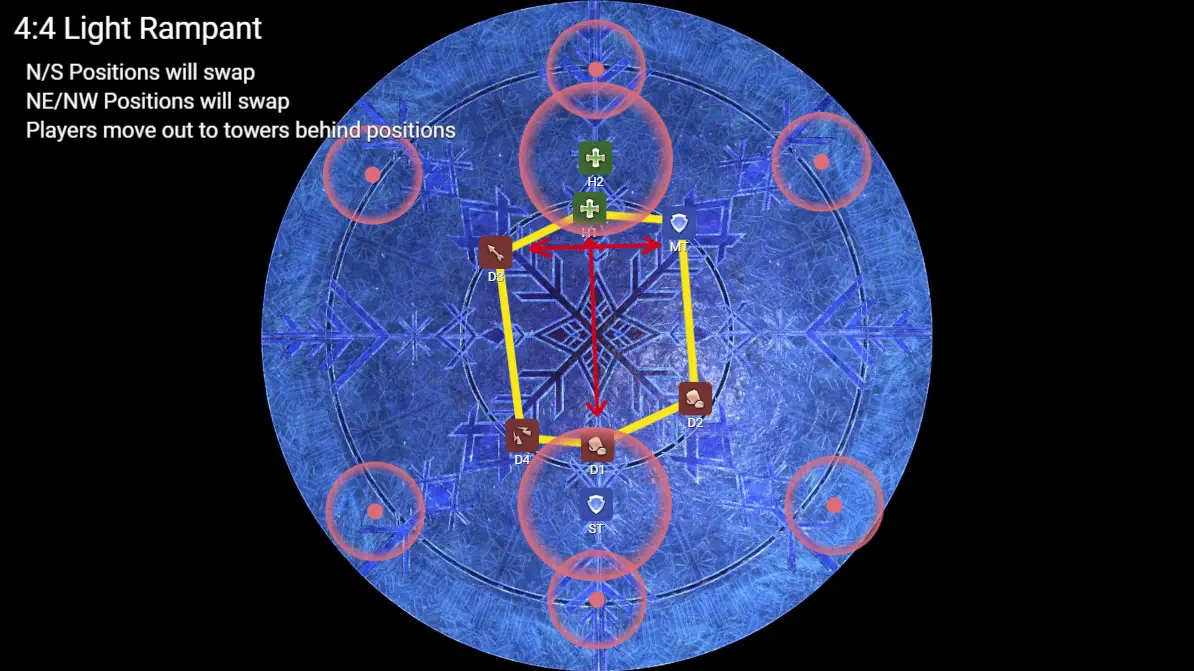
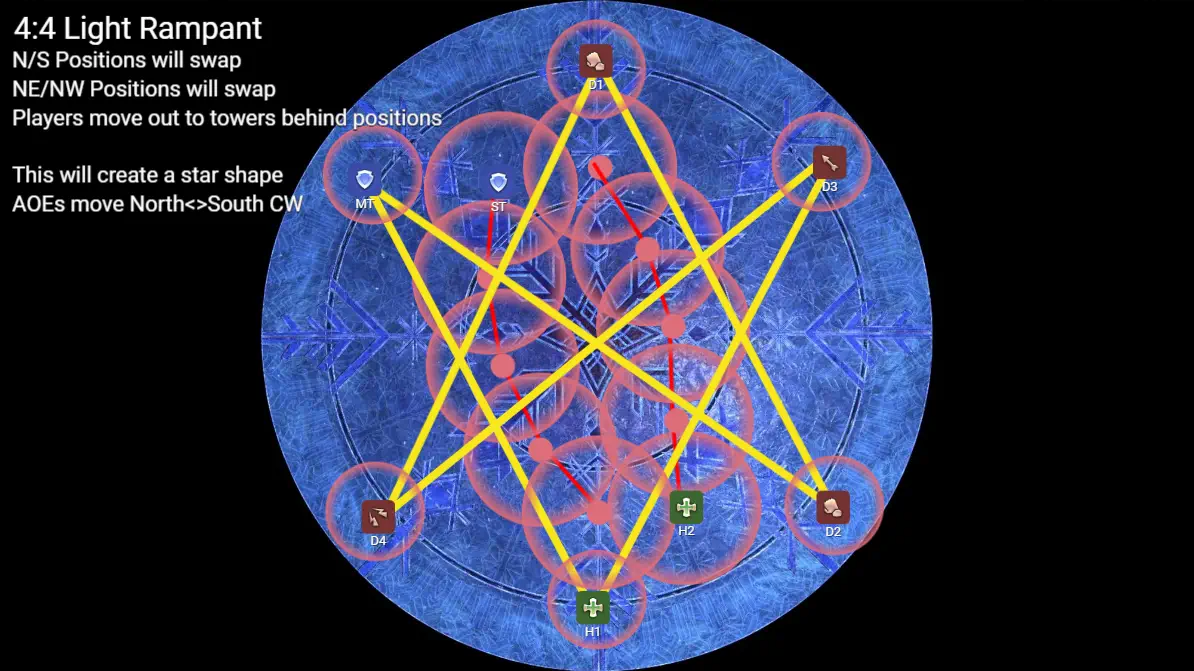
The 2 AOE players will start in the inner ring on the Arena at N/S and rotate CW to drop 5 puddle AOES each. After resolving the towers, Northern and Southern tether players should group up at North and South respectively. Each AOE player should also join a separate light party after they drop their puddles.
As this mechanic has been going on, players have been accruing stacks of Lightsteeped. Up until now the stacks have been self-contained as there is no way to change them without resolving the mechanic in the process (towers/light party stack). If a player gains more than 4 stacks, the raid will wipe.
As each group makes their final dodge, a 4 player tower will appear in the centre of the arena. Players with 2 stacks of Lightsteeped should walk into the tower to soak it.
This is immediately followed by another Banish III, and House of Light, which will hit every player with a protean AOE and increase their Lightsteeped stacks to 4. Resolve this in Phase 1 clock spots and pairs for Banish III.
Shiva must be brought below 20% health before she finishes casting her enrage:
Absolute Zero
Intermission
All players will spread as seen in the image below and close to the centre of the arena, as there will be a short ranged knock back.
Ryne will become frozen in an Ice Veil in the centre of the arena, and 8 Crystals will spawn around the arena.
There will be 4 Crystals of Light on Cardinals and 4 Crystals of Dark on Intercardinals.
Melee players will begin to attack the Light Crystal on their spread position, and Range players will attack the Light Crystals adjacent to them (attacking the clockwise one first).
Do NOT damage the Dark Crystals. These crystals must be kept alive as it provides the Ice veil with a vulnerability up debuff.
As the party begins attacking these Crystals, Light Crystals will target the nearest player with a circle AOE and Dark Crystals will target the nearest player with a protean AOE. These AOEs will be baited by the player who is on the same spread position as the Crystal (Circle AOE/Melee & Protean AOE/Ranged).
Ranged players must bait these proteans out of the arena. If a Light Crystal is hit by a protean it will gain a vulnerability down buff and become difficult to kill.
Light Crystals also spawn a tether after a short period. This tether will drop large puddle AOEs. Melee players will take this and bait these AOEs around their crystal.
Once all the Light Crystals are destroyed, Players must DPS ice veil below 50% to transition to the next phase. Gaia will deal exactly 50% damage to the crystal to break it (if all Light Crystals were destroyed).
Phase 3: Oracle of Darkness (Gaia)
Gaia will start out the phase with Hell's Judgement, a raidwide that will set every players HP to 1.
This is immediately followed by:
Ultimate Relativity
P3 - Ultimate RelativityThis mechanic is quite dense. I recommend looking through toolboxes in addition to the written guide, to get a clearer understanding of positions.
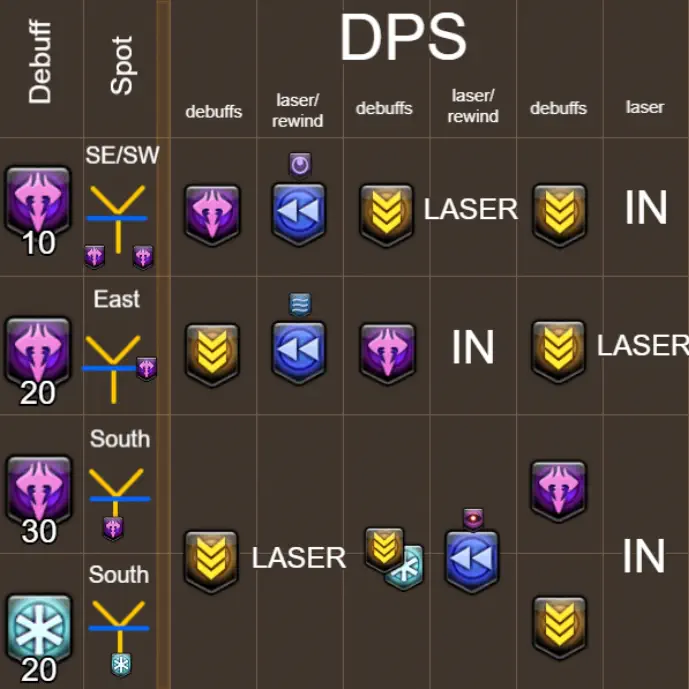
After a heavy hitting raidwide, several "Spell in waiting" debuffs will be assigned to each player:
| Debuff | Explanation |
|---|---|
Dark Fire | Large circle AOE |
Dark Blizzard | Large donut AOE |
Dark Eruption | Medium circle AOE |
Shadoweye | Gaze centered on the player |
Unholy Darkness | Party Stack that must be resolved with 5 players |
Dark Water | A stack that must be resolved with 4 players |
Return | A player's position will be recorded for later |
These buffs will be distributed amongst each role group to look like the following:
Supports
2 Supports with 30s Dark Fire
1 Support with 20s Dark Fire
DPS
1 DPS with 20s Dark Fire
2 DPS with 10s Dark Fire
As well as:
1 DPS with 30s Dark Fire and 1 Support with Short Rewind Dark Blizzard
OR
1 Support with 10s Dark Fire and 1 DPS with Long Rewind Dark Blizzard.
(Credit to Fae Fiyaa & Ewaen)
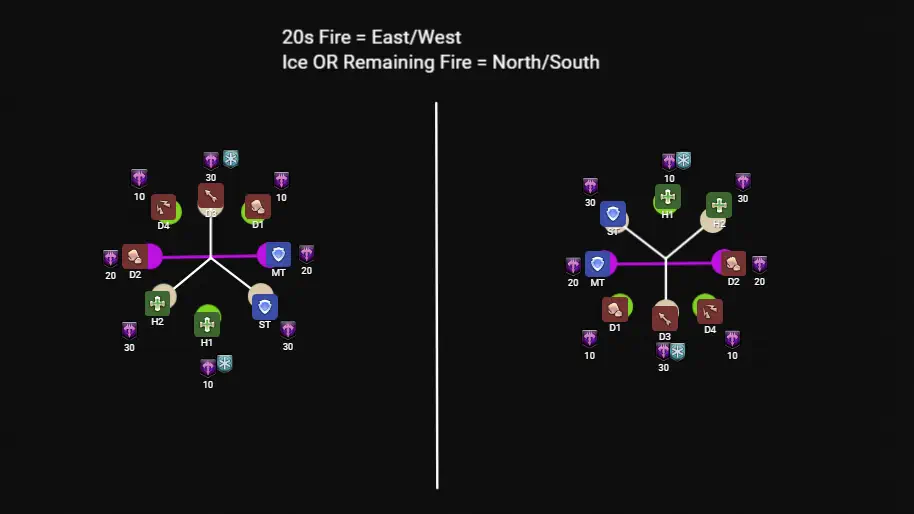
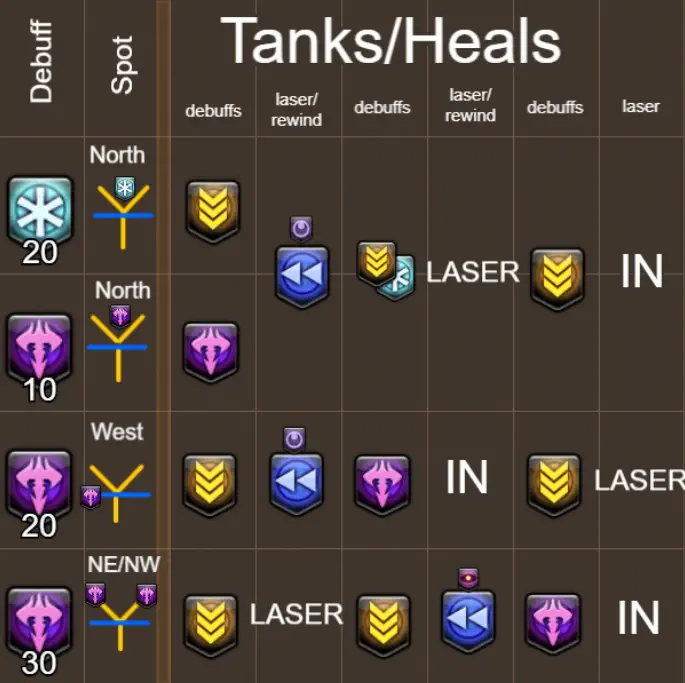
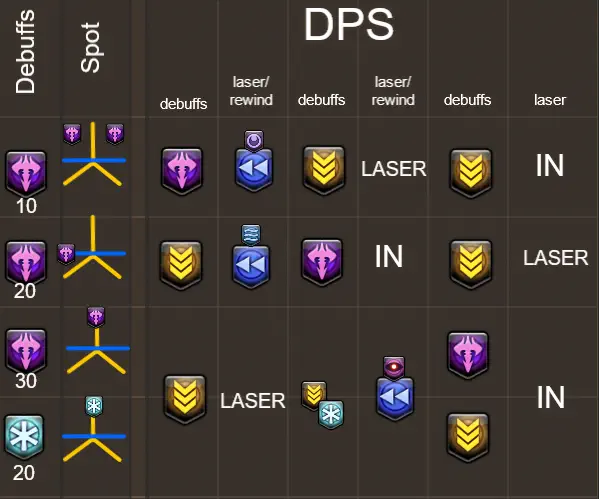
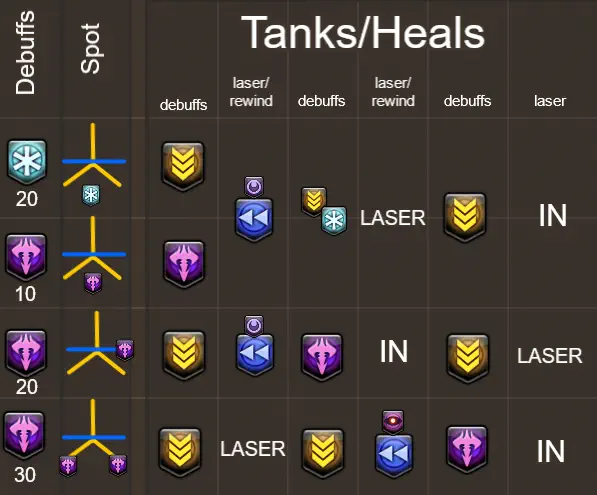
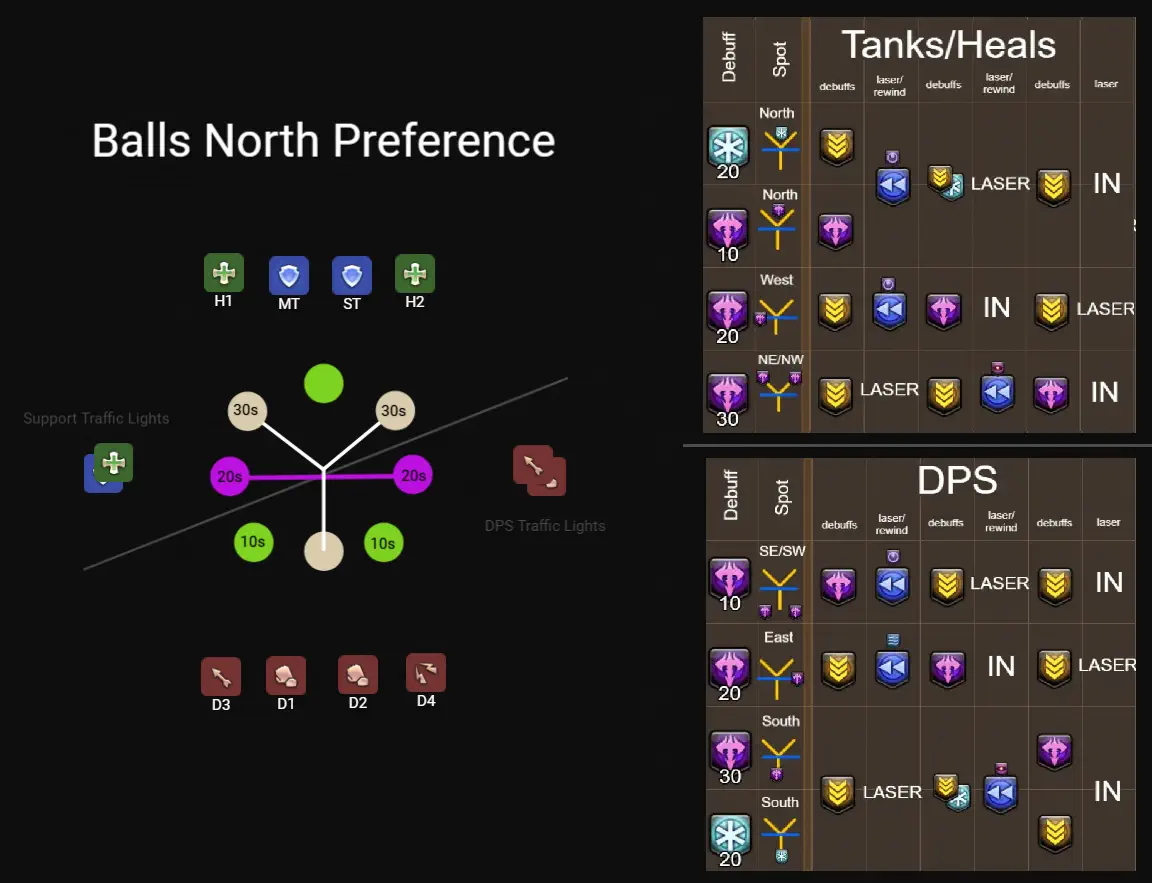
As well as this, 8 hourglass/traffic lights will appear around the arena. Gaia will then tether 3 of them in a Y shape with yellow tethers, and 2 others with a purple tether.
These Traffic Lights will spawn baited rotating AOEs that cleave 180(?) degrees in front of them. Yellow Tethered Traffic Lights go first, and Purple Tethered Traffic Lights go last.
There are 2 ways you can orient this arena. Either using the lone yellow traffic light as Relative North, or the empty space between the 2 close yellow traffic lights. Either method works, however if you are using the priority method below, you will have to reverse the prio for lone yellow north
All of these sounds incredibly intimidating and complicated, but it can be simplified for each person.
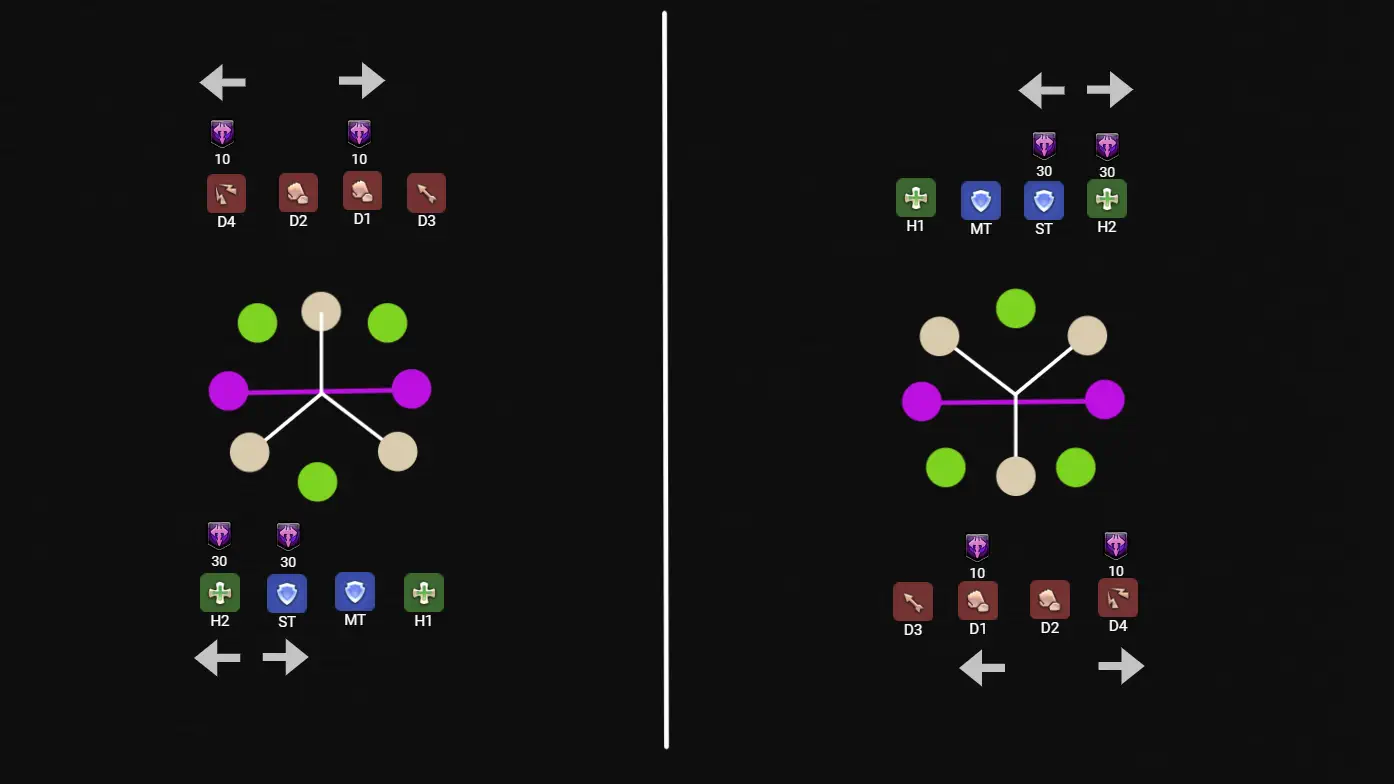
Once the cast bar goes off players will find Relative North. For this example I will be using the 2 yellow traffic lights as North (AKA: Balls North!)
DPS will look at their party list to determine which spread they are taking, in the priority D3-D1-D2-D4 looking at relative North. Supports will do the same with the priority H1 MT ST H2.
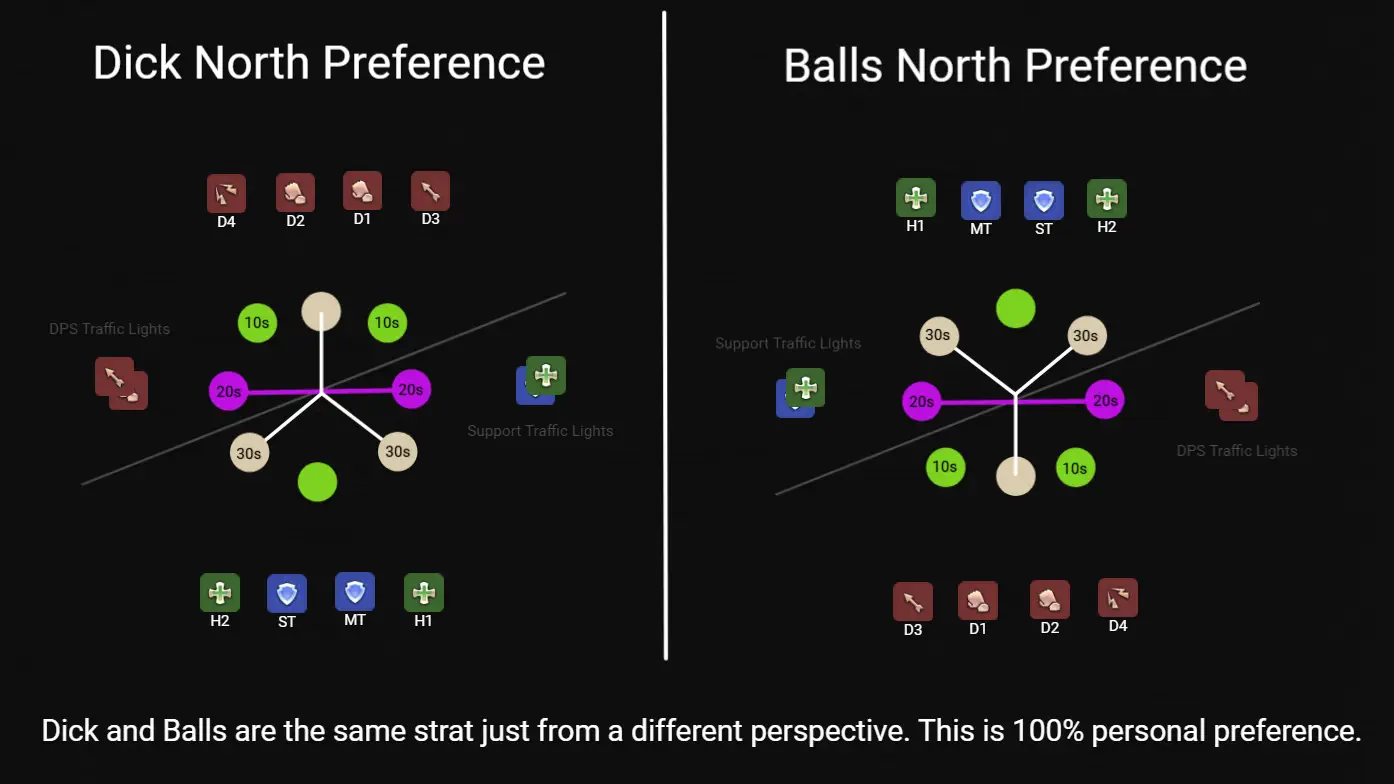
Any DPS with a 10s Dark Fire will use their priority take the SW and SE traffic lights.
Any Support with a 30s Dark Fire will use their priority and take the NW and NE traffic lights.
An example of this would be if I'm D1 and both D4 and I get a 10s Fire, the D4 would take SE and I would take SW.
The DPS and Support players with a 20s Dark Fire will go East (DPS) and West (Supports) respectively.
And finally, either: A Support with the 10s Dark Fire or 20s Dark Blizzard will go North, and a DPS with the 30s Dark Fire or 20s Dark Blizzard will go South.
TIP
You do NOT need to form a lineup to find your positions, this prio system resolves so that Ranged and Healers are always static and ONLY melee players flex by looking at one other party member to determine which direction they go.
For Example: If they have 30s Dark Fire, ST will always take NE traffic light (balls north relative) unless they have the same debuff as H2.
This will leave the spreads looking something like this:
Here is a timeline of events:
After sorting the starting positions, 10s Dark Fire players will step out to take their AOE between their respective Traffic Light and the wall. If you are a Dark Blizzard stay stacked in middle.
At the same time as fire debuffs are being solved, an Unholy Darkness party stack will occur in middle, so players who are not resolving a mechanic should AFK in the center of the arena.
Shortly after, the first set of Traffic Lights will go off. Players can essentially just stare at their Traffic Light until the spinning arrow appears around its base for an indication of when they should step out to bait. At the same time, the 1st set of Rewinds will go off. Players with Dark Water/Shadoweye should come close to the center whilst being in line with their Traffic Light, with Dark Water standing slightly closer to the center.
It is important Shadoweye players don't stack right on top of eachother as the may accidentally gaze one another later. Players with Dark Eruption should stand just in front of their Traffic light.
Afterward 20s Dark Fire players will step out to take their AOE.
The second set of baits and rewinds will then go off. Use the same prio as before: Dark Water/Shadoweye mid, Dark Eruption on Traffic Lights. If you have nothing to do just AFK.
The 30s Dark Fire players will then step out to take their AOEs.
The final set of Traffic Light baits will then go off and everyone will stack mid. ALL players should look OUT of the arena towards their clockspot.
Rewind will pull everyone back to their recorded position and the Dark Water, Shadoweye and Dark Eruption will all go off at once.
The following cheatsheets can help summarize the process of events through this mech, these can be useful to help with learning positions:
Flipped Version
Images flipped upside down if you prefer looking at it this way. The strat is exactly the same and compatible with the images above.
Gaia will follow Ultimate Relativity with a Party Stack, a Shockwave Pulsar raidwide, and a Black Halo Dual Tank Buster Cleave
Apocalypse
Apocalypse - LP PrioBonus: How to read safespotsLight Party 1 will move slightly West of the boss and Light Party 2 will more slightly East.
In their Light Parties, each player will form a small square to indicate the position that players will take a spread AOE later in the mechanic.
(image, ranged back melee front etc)
Gaia will begin to cast Dark Water III, granting 6 players 3 different Dark Water stack debuffs. In pairs of 2, these stacks will have the timers: 10s, 29s, and 38s.
Using the priority system below (which you may recognise from TOP), players with the same stack timer (or lack of stack) as another in their Light Party will flex to the opposite party so that stacks will not overlap.
As 2 or 4 players will be flexing, each player will simply fill the hole in the square that the previous person has left.
Players will stay in these "flexed groups" for the remainder of the mechanic.
After the 1st Stack goes off, Gaia will cast Apocalypse, and glowing lights along the lines in the floor will begin to move out and rotate around the arena, indicating a safespot for the upcoming AOEs.
These lights will always be 180 degrees from eachother and will both rotate clockwise or counterclockwise. The safe spot will be 1 waymark back from the direction they rotated. For example: if the lights went to N/S and rotated counterclockwise, the safespot would be NE/SW.
Each Light Party will then spread for a Spirit Taker AOE on a random player, and then each Party will go to their corresponding light as they cast from Gaia (using the same positions as Utopian Sky from phase 1).
Once the safespot is identified, each party will move into it and spread out using the aforementioned "square" spread.
The safespot for all 4 will be the initial safe cardinal/intercardinal, and the cardinal/intercardinal opposite the spin of the AOEs.
TIP
The players at the front can keep full melee uptime but must be careful, as the inner exploding AOE is quite large. I recommend breaking max melee and tapping forward until you're just able to hit Gaia.
If you are up the front, I would also save sprint for the 2nd AOE hit and simply step forward into the center rather than running along the safe cardinal/intercardinal.
Both of these can be seen in the video below.
The AOEs will then begin to go off as each party spreads. After the 2nd set of AOEs, each spread will go off and the party will rush along the cardinal or intercardinal that the safespot was on, and stand just outside the innermost circle of the arena for the 2nd stack.
As soon as the 2nd stack resolves a tank must immediately run to the next available safe spot to bait Darkest Dance, a tankbuster that is baited on the furthest player away.
TIP
The tank can simply watch the AOEs rotate as the safespots will always be 180 degrees from eachother. After the stack goes off they can sprint to the next upcoming safespot.
(theres a better way to tell, 45 degrees from safespot will write up later)
Both parties will follow Gaia to this new north, and keeping the same flexed parties, Light Party 1 will go slightly West of Gaia, and Light Party 2 will go slightly East of Gaia.
Gaia will then knock back the party towards the wall.
Each Light Party should make their way toward Gaia to ensure that everyone can reach the stack.
Shortly after this knockback the 3rd and final stack resolves.
After another Shockwave Pulsar, Gaia must be damaged below 20% HP before she casts her enrage:
Memory's End
Phase 4: Enter the Dragon (AKA Ryne & Gaia)
EVERYONE
All players should keep a close eye on both bosses health here. Immediately after the first mechanic is a hand of pain style health check. If the health differential is greater than 5% the party will wipe. The boss that is too high HP will be tethered during the Ahk Morn cast.
TANK
Ryne will be doing two auto attacks on the two players with the highest emnity, requiring the OT to have 2nd aggro on Ryne.
Gaia will become untargetable and disappear. Usurper of Frost (Ryne) will then appear true North/South, and a memory crystal will appear true North. Ryne will always spawn opposite of where Gaia phased previously.
WARNING
Be extremely careful with placement of any AOEs (Water Stacks, Eruption, Spirit Taker etc), as if the crystal at North takes any optional damage it will be destroyed and the party will be unable to reach phase 5.
Hraesvelgr will coil around Ryne. Baited AOEs will appear under each player once his wings sprout. The party will stack true west of Ryne (waymark 1 or 4), and quickly move to the center of the arena after the wings sprout from Ryne's body.
The memory crystal will pulse and Oracle of Darkness (Gaia) will appear and teleport to South.
EVERYONE
Everyone should swap to DPSing Gaia here until they are both even in health.
Both bosses will then cast:
Darklit Dragonsong
Darklit DragonsongWARNING
Due to the raidwide doing heavy damage on a 2 minute window, along with outgoing debuffs from the light tethers you may reach buffcap. In this circumstance, the oldest buffs will disappear. This can cause mit, shields, and buffs (such as dance partner) to disappear.
All players will be assigned 3 stacks of Lightsteeped
2 random players will be assigned a Dark Water that will go off in 19s.
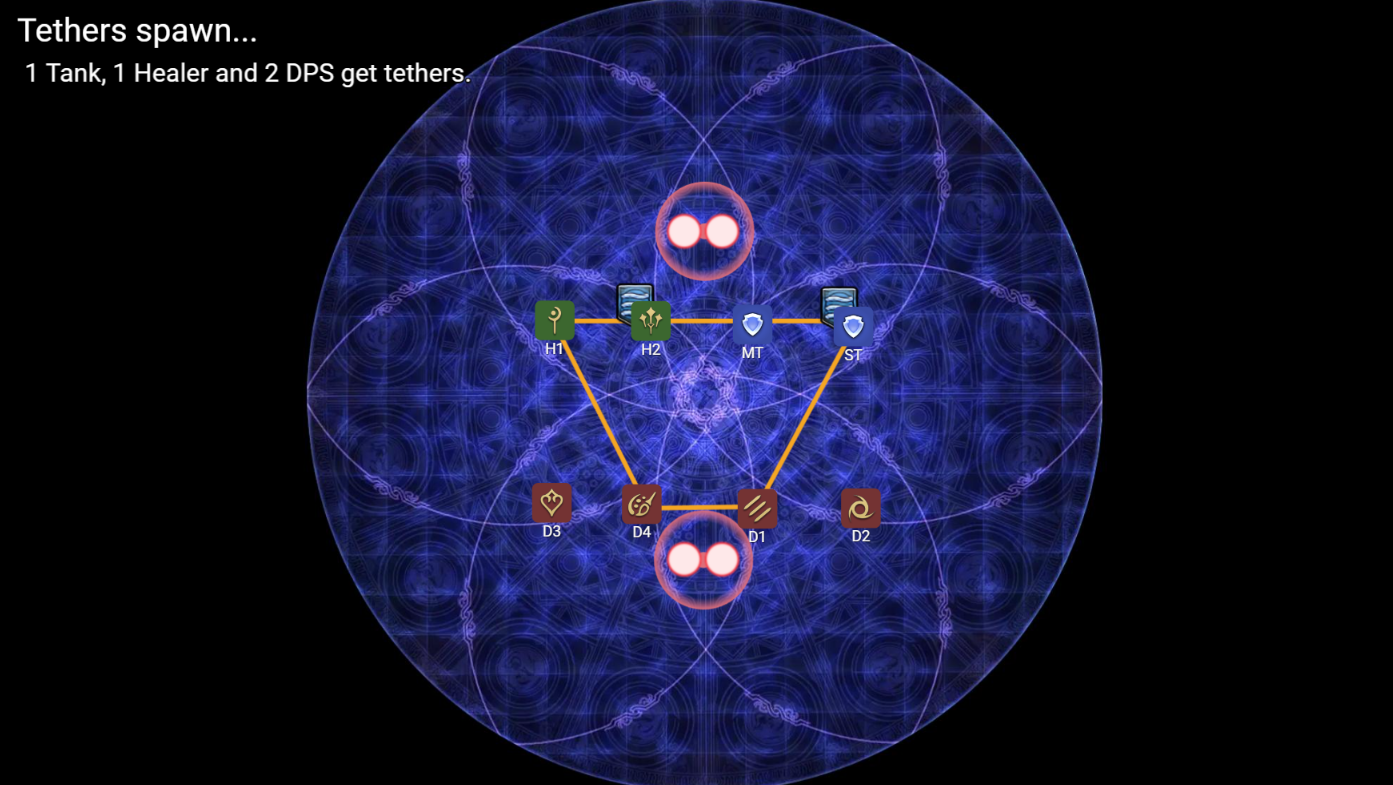
1 Tank, 1 Healer and 2 random DPS will be tethered with Light Rampant chains and 2 towers will appear that require 2 players in each to soak.
Ryne will also cast 4 proximity based Protean AOEs from her that will be baited by the 4 remaining non-tether players.
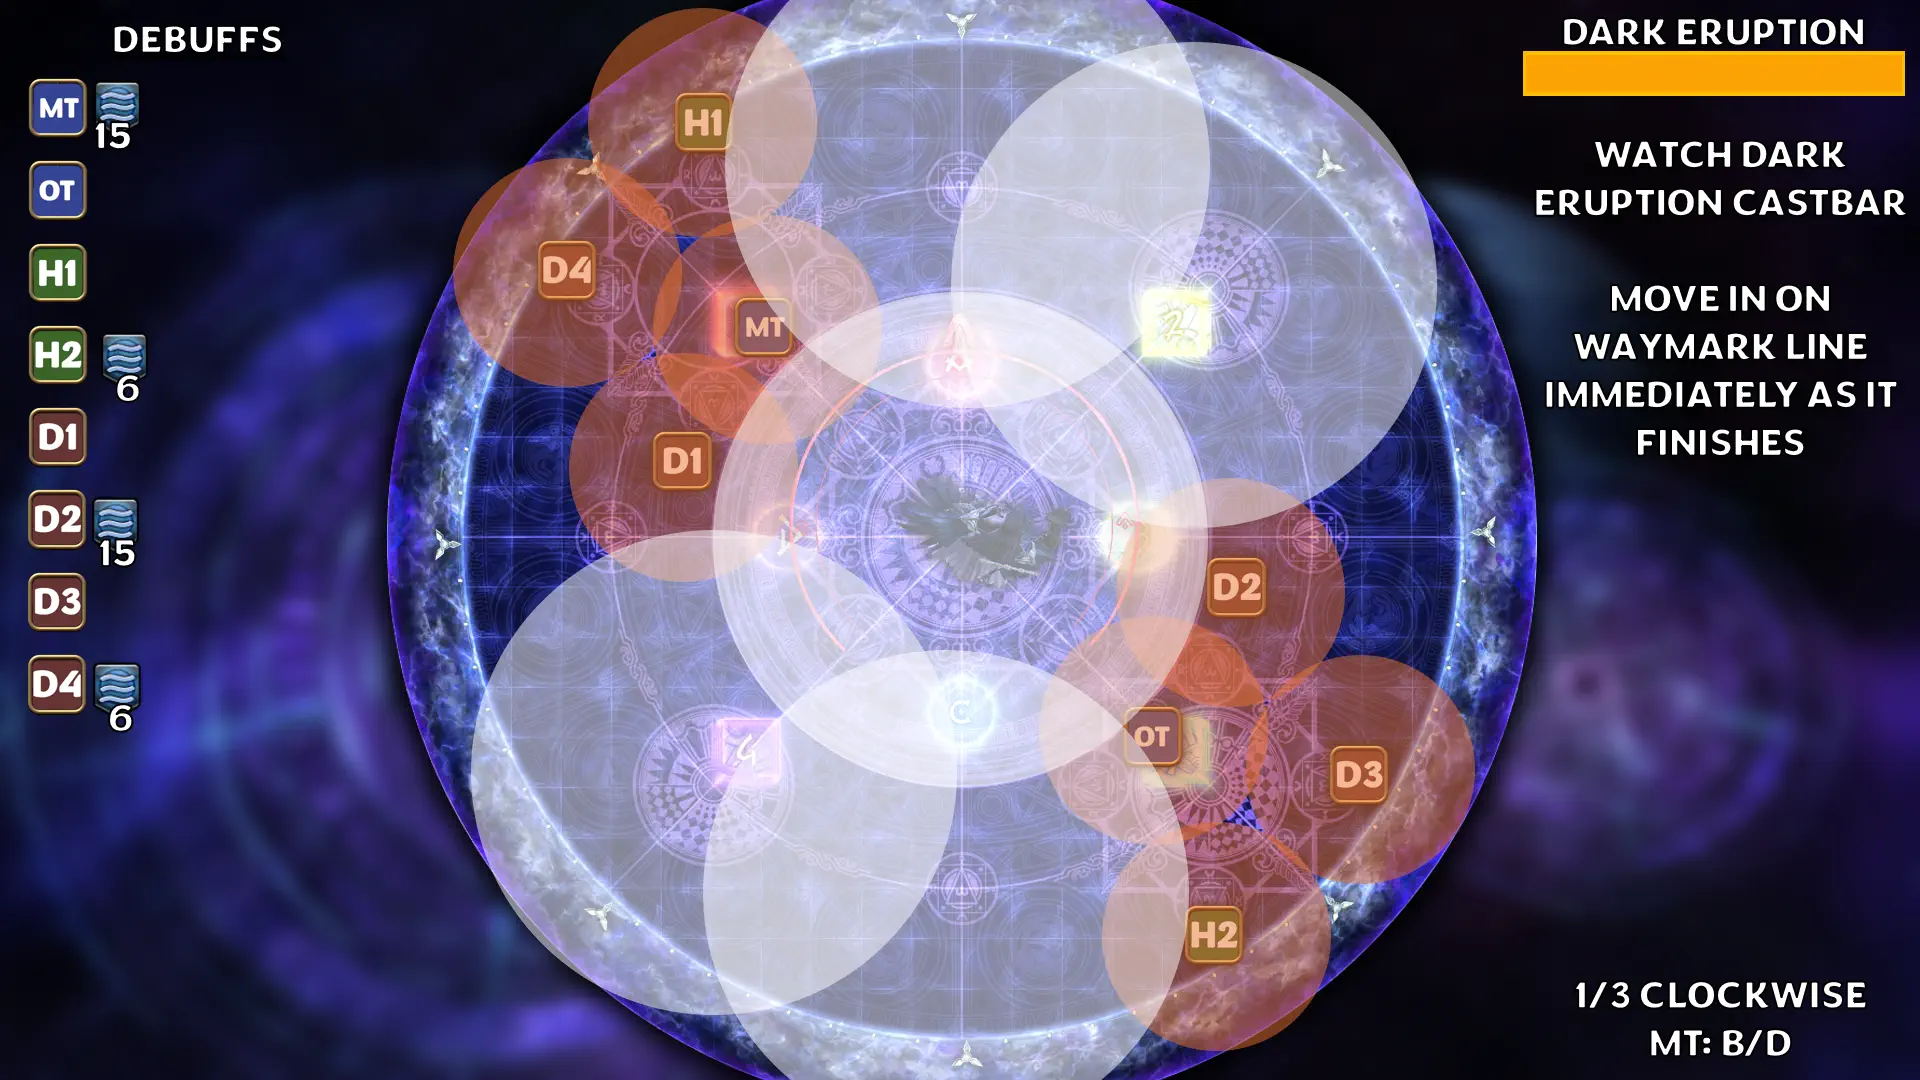
To begin, each player will stack mid as Ryne transformed before quickly moving to the following lineup with supports true North and DPS true South
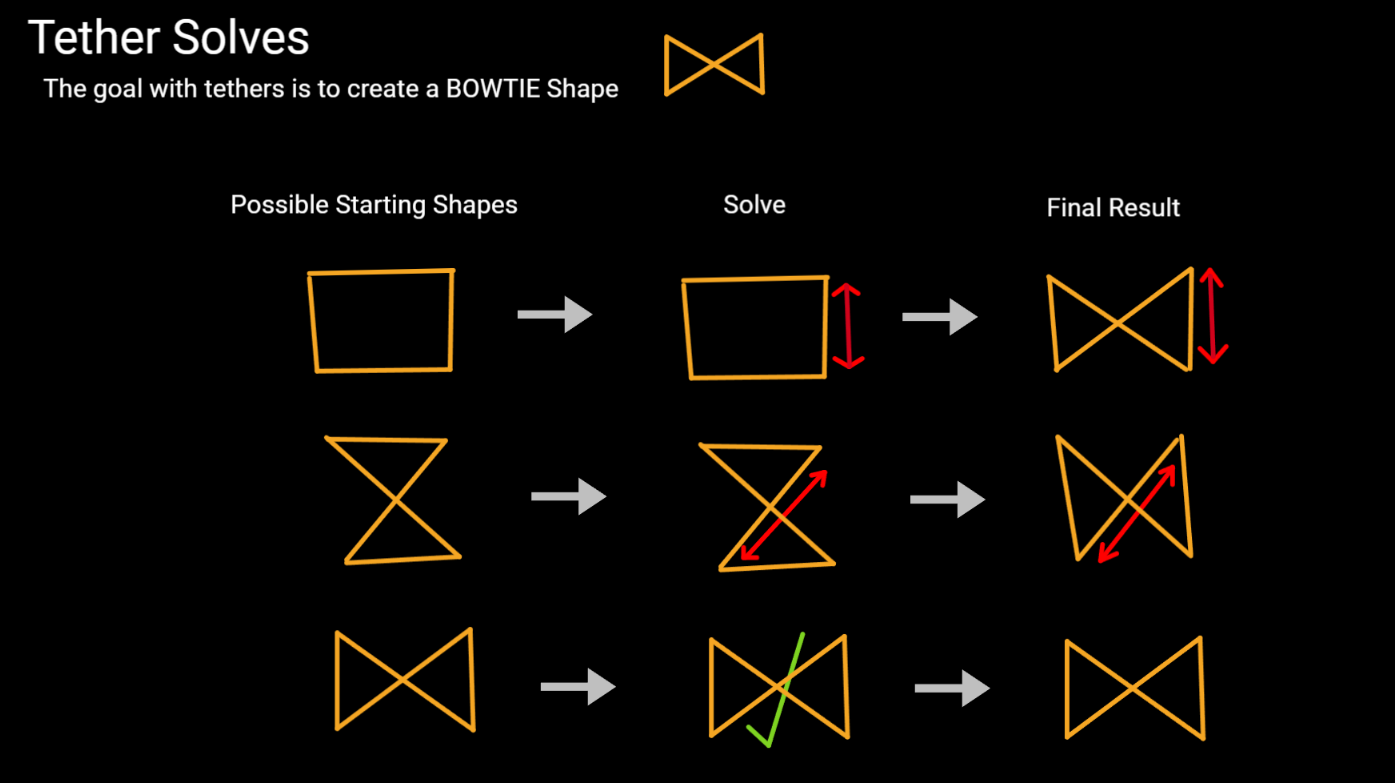
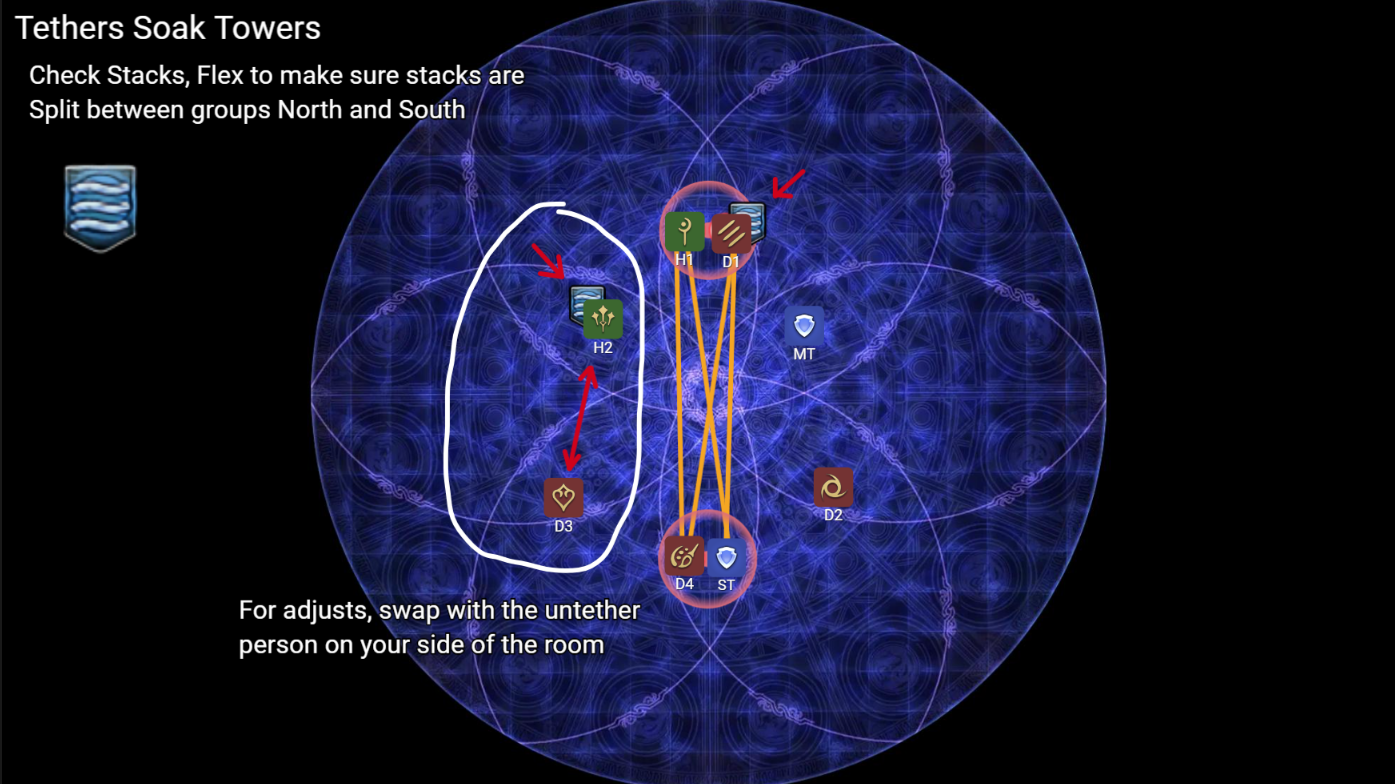
The tether players will quickly determine what shape the tether is currently in and make a bowtie shape. This is to ensure 2 players from each side can soak towers while still satisfying the length requirement for the tethers.
Once the bowtie is formed, the tether players will stand in their towers, and the 4 remaining players will split left/right and shuffle close to Ryne to bait out the Proteans. If both water stacks are on the same North/South side of the room, the untethered AOE player will swap with the untethered player on their side of the room to ensure the water stacks are split north/south.
After the towers and AOEs resolve, Gaia will cast Sprit Taker, targeting a random player again. All players will roughly spread to resolve this. Immediately after Ryne will cast Hallowed Wings, cleaving one half of the arena. The party will shift over into the safespot and take the Dark Water stacks.
INFO
The North stack here should be careful not to clip the crystal. Shifting slightly south or further into the safe side can make it more comfortable.
A tank will immediately run to true East or true West (whichever is furthest) to bait out a Somber Dance tankbuster, followed by another Somber Dance baited on the closest person.
The crystal will then pulse with an Edge of Oblivion raidwide and both bosses will move to the middle. Light Party 1 will stack North and Light Party 2 will stack South for Akh Morn. Because these stacks are baited on tank emnity, both tanks must have aggro of each boss.
This will then be followed by a Morn Afah, a party stack that acts like a hand of pain HP check. The party will take the stack in the center of the arena.
Both bosses will move and then cast:
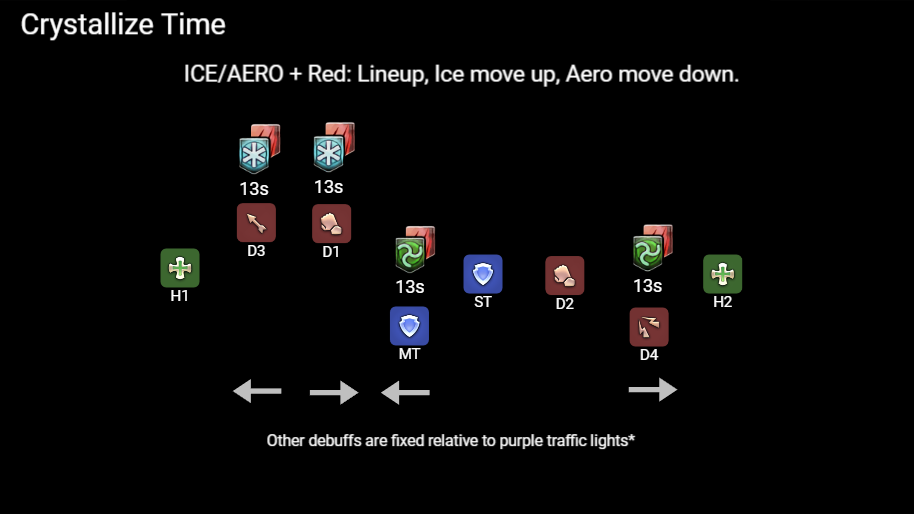
Crystallize Time
Crystallize TimeHEALER
Shortly after the Crystallize Time cast the crystal will pulse for additional damage. It is recommended to shield for this initial pulse, and then apply shielded mitigation (such as spreadlo) afterwards.
This mechanic is extremely dense and has many minute details that must be taken into consideration. I highly recommend watching as many POVs as possible, as well as studying the toolbox in addition to this guide.
As Crystallize Time is cast, 4 players will be assigned a Wyrmclaw (Red) debuff, and 4 players with a Wyrmfang (Blue) debuff. Within the Red debuffs, there will be 2 Dark Aero players and 2 Ice players. Using a lineup/prio system below, these players will sort themselves so that one Dark Aero and one ice are on East and West of the arena.
A Spell-in-Waiting: Quietus debuff will also be applied to 3 random players.
From left to right: West - H1 D3 D1 MT ST D2 D4 H2 - East
| Debuff | Explanation |
|---|---|
Wyrmclaw | A debuff that creates a large AOE and puddle when you touch a dragon |
Wyrmfang | A debuff that must be cleansed by picking up the puddle from Wyrmclaw |
Dark Aero | A very large AOE with Knockback when expires |
Quietus | A heavy hitting raidwide |
Dark Blizzards will step up, Dark Aero debuffs will step down, look at the two players standing north/south of the lineup to determine who goes East/West.
Red players must intercept dragonheads that will begin to travel around the arena from North to South. Intercepting these dragons will cleanse the debuff, and cause a large AOE explosion aswell as leaving behind a small puddle on the floor. This puddle must be picked up by a Blue player to successfully cleanse their own debuff. Allowing either of these debuffs to remain unresolved will immediately kill the player.
As well as these Red and Blue buffs everyone will also gain an additional debuff. As mentioned prior Red players will have 2 aero and 2 Dark Blizzard. Blue players will have 1 Dark Blizzard, 1 Dark Water, 1 Unholy Darkness, and 1 Dark Eruption.
As Blue players will need to soak a debuff, we use these debuffs to indicate who takes which puddle. As each puddle is left in the proximity of a waymark, Blue players will take puddles following the list below:
/e STACK - B (Yellow)
/e WATER - 3 (Blue)
/e DARK - D  (Purple Side)
/e ICE - 4   (Purple Corner)
In addition to debuffs going out, 6 Traffic Lights will spawn. The Traffic Lights have two possible spawn iterations, where the mechanic solve is simply flipped horizontally.
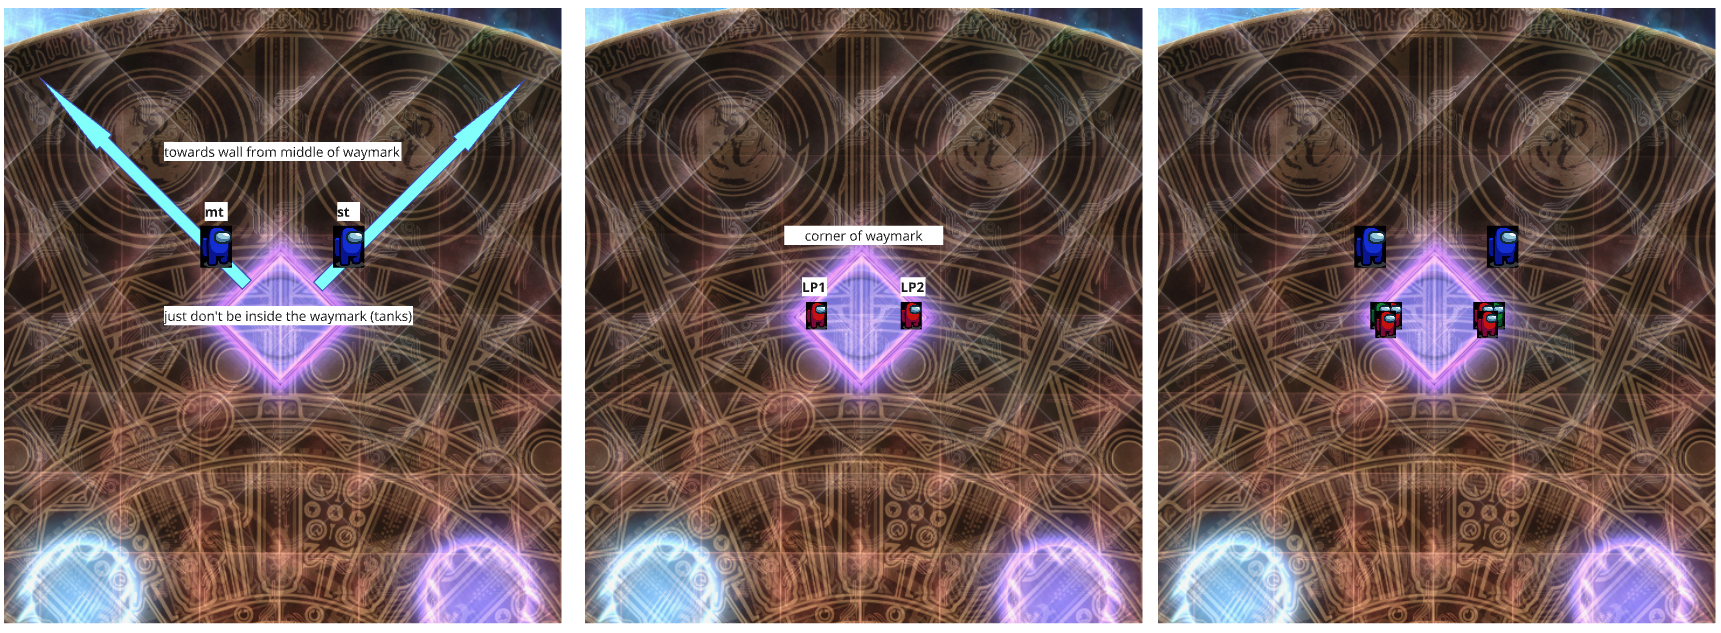
With the crystal being true North, 1 Yellow Tether will always be North/South and 1 Purple Tether will either be North West/South East or North East/South West. These Traffic Lights will blow up in a large circular AOE, the hitbox of which can be seen on the arena floor.
The following is a run-down of the mechanic:
The assigned Red Dark Aero player, and all the non-Dark Eruption Blue debuff players will go to the South Purple Tether. The Dark Eruption Blue debuff player will go to the North Purple Tether. The other Aero player will simply mirror this movement on the non-purple tether side.
The Red Dark Aero and Dark Eruption player will stand 2 pips down from the star on the arena's edge so that they are leaning South/North respectively.
Meanwhile the the ice players will stand directly East/West to intercept their dragon. The eruption side Ice player should intercept their dragon before moving to the eruption player. The non-eruption side ice will move to the wall and slightly south to avoid the traffic lights. After the traffic light goes off, they can move to join the other players at north.
(image)
After the Yellow Tether traffic lights go off the south Blue players will immediately move just in front of the Red Dark Aero player. The Dark Water, Dark Blizzard, and Dark Aero will then all go off at once, launching the Blue players to the opposite side of the arena, and they will stack with the Dark Eruption & Red Dark Blizzard player of that side to resolve Unholy Darkness.
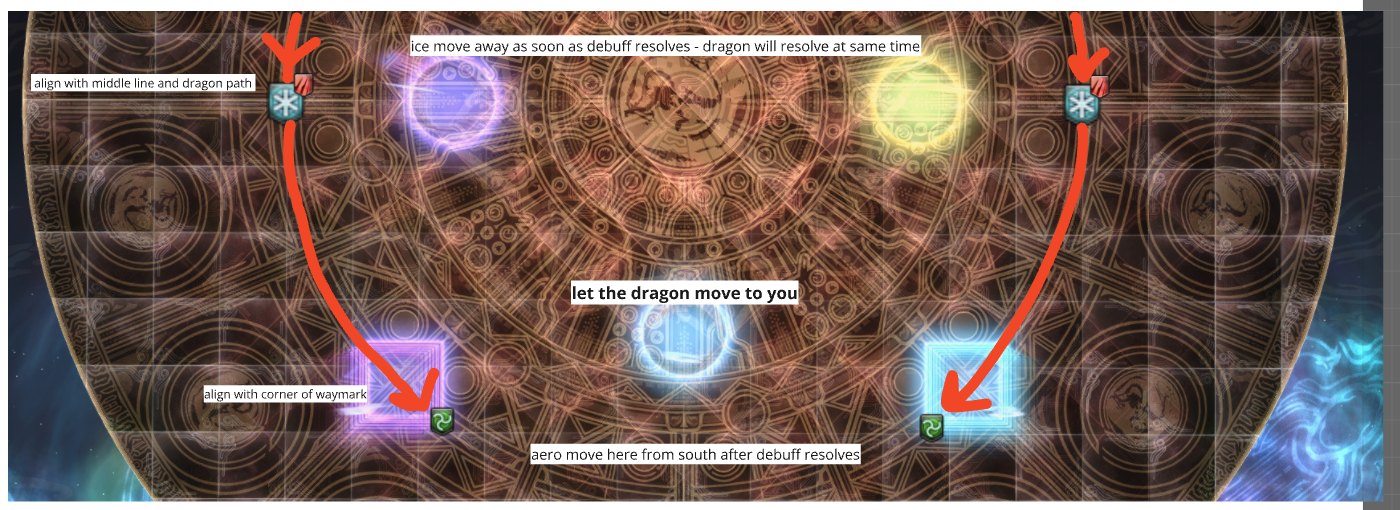
After the stack resolves, all North players (Blue & Red Ice) will shift over to the North Cardinal.
Line Exas will then begin to propogate from either East or West, as well as the final Purple Tether AOE going off.
As safely and quickly as possible, each Blue player will begin to make their way to their corresponding waymark to cleanse their debuff. As they move across the arena, a second Exa starting from North or South will begin to move across the arena.
The starting position of both of these Exas must be remembered, as they are the starting position for two upcoming wild-charge knockbacks.
For example if the Exas started West and North, the North West intercardinal will be "safe".
After cleansing their debuff, everyone should run to the safe intercardinal and stack on the waymark as seen below:
INFO
If a blue player is unable to cleanse their buff in time, they can run to the safe spot to drop their rewind, and then run to go cleanse immediately after as there is a short window before the puddle despawns. (image)
At the same time, the spell in waiting: "Quietus" will go off, dealing raid wide damage.
After placing rewinds, players will immediately spread away from the crystal at north to take another Spirit Taker AOE.
The Rewinds will then go off, pulling the party back to the "safe" waymark for the two wild-charges.
After this resolves, Ryne and Gaia will appear and become targetable, immediately starting another dual stack Akh Morn which will be resolved the same as the Dark Lit variant. This is followed by another Morn Afah hand of pain check
Ryne and Gaia will then cast their respective enrages:
Absolute Zero & Memory's End
Phase 5: Pandora
Phase 5 is a simple phase that repeats multiple mechanics over until enrage with Paradise Lost. This is a tight DPS check, and it is important to avoid any Damage Downs or Deaths at all in this phase.
- Fulgent Blade (Exas)
- Paradise Regained (Wings & Towers)
- Polarizing Strikes
- Pandora's Box (Tank LB)
- Fulgent Blade (Exas)
- Paradise Regained (Wings & Towers)
- Polarizing Strikes
- Fulgent Blade (Exas)
- Paradise Lost (Enrage)