Cloud of Darkness will open by using Blade of Darkness twice, a telegraphed cleave AoE with 3 variable safe spots depending on the glowing arm she raises.
If she raises one glowing arm, she will swipe the entire arena but leave a small safe spot next to her other arm.
If she raises both glowing arms, she will swipe a large circular area in front of her, requiring players to get away.
NOTE
Getting hit by the cleave only results in Sustained Damage; be mindful of your healing tools if you intend to eat the cleave for uptime.
Phase 1 is primarily about staying on your feet and keeping track of both your Grim Embrace debuff and any stored Aero IV/Death IV casts before they catch you unaware.
TANK
For the entirety of this phase, her auto attacks will target the 3 highest emnity players and apply a stacking vulnerability.
It's recommended to use some of your personal mitigation for extended periods of auto attacks and swap threat with your co-tank every 4-6 stacks.
EVERYONE
In this phase, Cloud of Darkness will take increased damage. Try to deal as much damage as you can here through bursts, potions and even LB3.
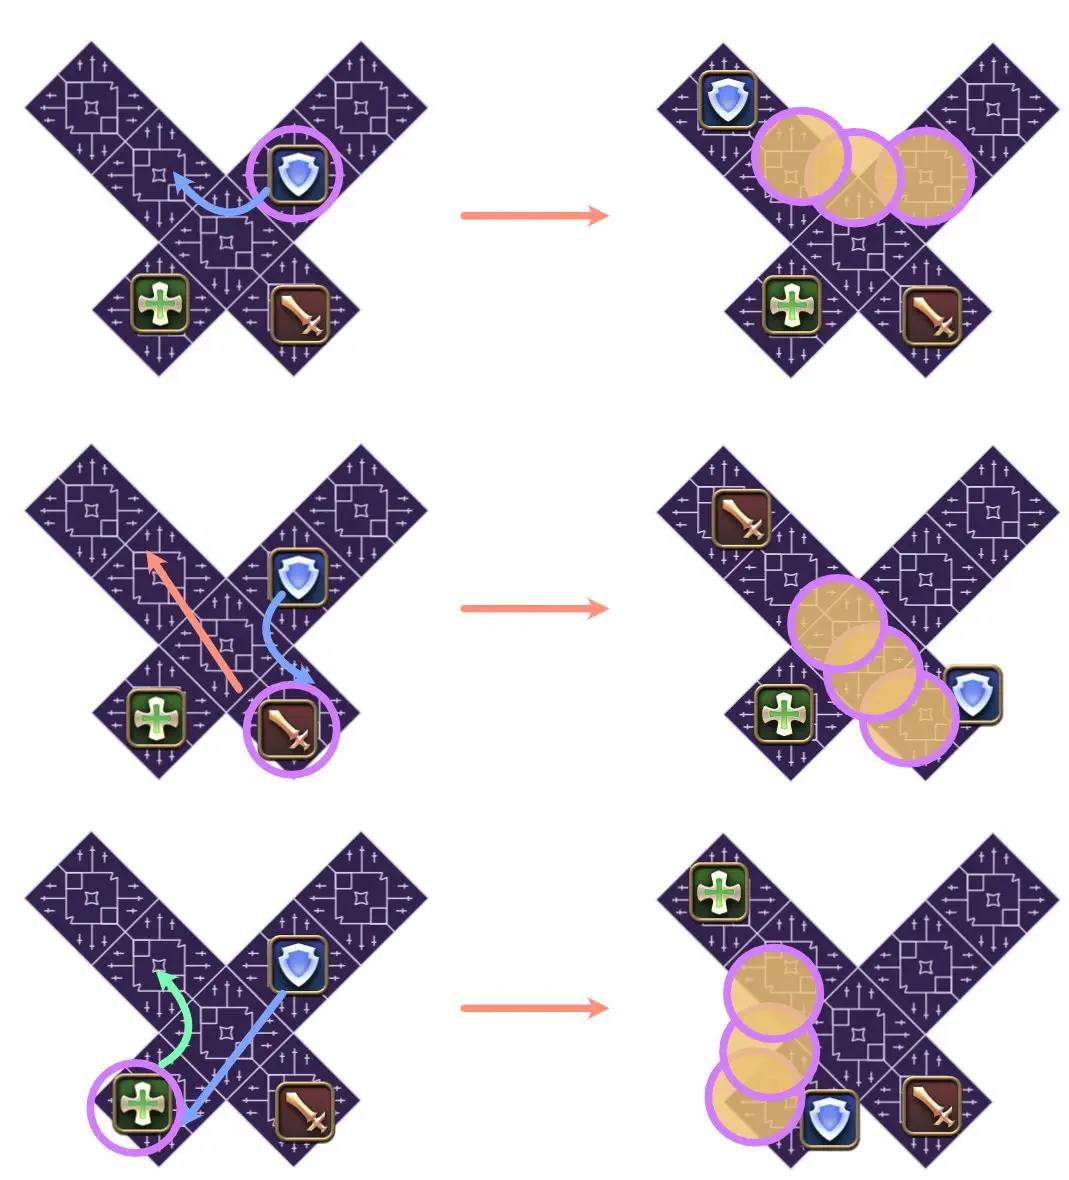
Cloud of Darkness starts by casting Grim Embrace twice, tethering half the raid with each cast and applying a debuff that will summon a hand facing towards you when it expires. This hand lunges in the direction it's facing and how it faces you is determined by her animation while you're tethered.
Her hand is under the crystal; the hand will spawn behind you. Step backwards when it spawns.
Copy image link
Her hand is in front of the crystal; the hand will spawn in front of you. Step forwards when it spawns.
Copy image link
Throughout the phase these debuffs will resolve in batches, requiring players to break away from the raid so as to not hit other players.
HEALER
Players hit by the hands will get a cleansable Doom. Have Esuna on hand, ready to cleanse anyone hit.
Cloudlets of Darkness will spawn with an on-screen alert, manifesting in the back of the arena and shooting linear beams in 4 sets. Use the tiles on the ground to help you dodge these.
From here, the sequence of mechanics splits into two, with one randomly selected sequence playing out here and the other sequence playing out after Phase 2.
Sequence 1
Flares - One player in each alliance is targeted with a flare, take these to your respective corner.
Alliance A takes the West corner.
Alliance B takes the South corner.
Alliance C takes the East corner.
Everyone else stands along the North wall.
Unholy Darkness - Each healer is targeted with a stack marker.
LP1 of each alliance stands inside the boss' hitbox.
LP2 of each alliance stands along the boss' hitbox.
Blade of Darkness
Enaero IV/Endeath IV - Cloud of Darkness will store a cast of Aero IV or Death IV for later. Read the castbar.
Aero IV is a knockback AoE from the centre. Aim to get knocked back to a corner.
Death IV is a draw-in to the centre, followed by a small pointblank you must walk into after it resolves to avoid the incoming donut. Aim to be drawn-in from a corner.
HEALER
Players hit by Death IV will get a cleansable Doom. Have Esuna on hand, ready to cleanse anyone hit.
Both the knockback and the draw-in can be nullified with Arm's Length/Surecast.
Break IV - Cloud of Darkness and 2 Sinister Eyes along the edges will cast a gaze attack, look away from them all.
Blade of Darkness + Aero IV/Death IV - Dodge the cleave. The Enaero IV/Endeath IV that was stored from before will resolve here, directly after the cleave.
Cloudlets of Darkness
Aero IV/Death IV
Sequence 2
Aero IV/Death IV
Aero IV is a knockback AoE from the centre. Aim to get knocked back to a corner.
Death IV is a draw-in to the centre, followed by a small pointblank you must walk into after it resolves to avoid the incoming donut. Aim to be drawn-in from a corner.
HEALER
Players hit by Death IV will get a cleansable Doom. Have Esuna on hand, ready to cleanse anyone hit.
Both the knockback and the draw-in can be nullified with Arm's Length/Surecast.
Enaero IV/Endeath IV - Cloud of Darkness will store a cast of Aero IV or Death IV for later. Read the castbar.
Rapid-Sequence Particle Beam - Targets 1 player in each alliance for a wild-charge stack in 4 sets. Stick with your alliance to share the damage.
Alliance A will stack West.
Alliance B will stack in the middle.
Alliance C will stack East.
Tanks should be at the front of the party, taking the brunt of the damage with cooldowns.
Cloudlets of Darkness
Blade of Darkness + Aero IV/Death IV - Dodge the cleave. The Enaero IV/Endeath IV that was stored from before will resolve here, directly after the cleave.
Flares - One player in each alliance is targeted with a flare, take these to your respective corner.
Phase 2 is much more controlled in terms of mechanics and positions, but the punishment for failing mechanics are harsh if not accounted for and can quickly lead to a wipe.
To start, Cloud of Darkness will transform the arena into two distinct parts.
Outer Platforms
2 square platforms on the East and West, connected by a large outer ring.
2 Atomos populate each side of the outer ring.
Killing these will drop a puddle, which when stepped into, will inflict a debuff that teleports a player in the indicated direction when resolved.
Use these to teleport to the inner platform if needed.
If they aren't killed in time, they will tether to the closest player, draining their health and healing the boss.
Inner Platform
1 inner platform, made up of tiles from E9S creating a hashtag (#) shape.
These tiles can break under certain circumstances, and regenerate after a few seconds if broken. There are visual indicators if the tile is about to break.
If 2 or more players occupy the same tile.
If a tile is occupied for too long.
A tile's timer can be reset by moving to a different tile.
The general priority for movement is to allow Healers to move first if needed, then Tanks, then DPS.
Cloud of Darkness also teleports into the middle of the inner platform and summons 2 Stygian Shadows on the East and West platforms, damage done to the shadows will be replicated to the Cloud of Darkness at the end of the phase.
When the platforms form, players on the outer platforms get a debuff that nullifies any damage they do to Cloud of Darkness. Similarly, players on the inner platform get a debuff that nullifies any damage they do to the Stygian Shadows.
NOTE
Atomos are not affected by these debuffs. This means players on the inner platform can still hit and kill the Atomos if players on the outer platform forget or are unable to.
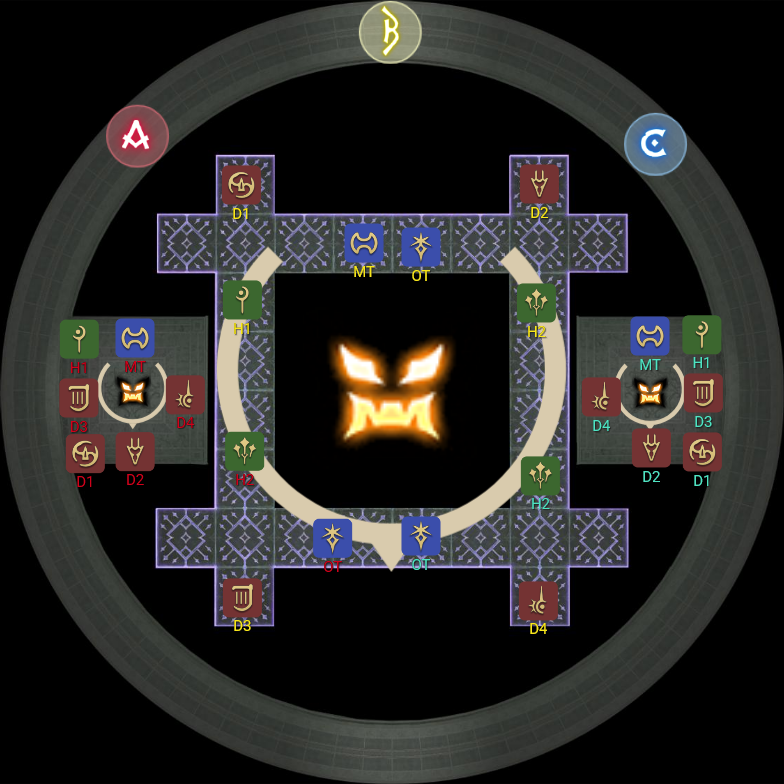
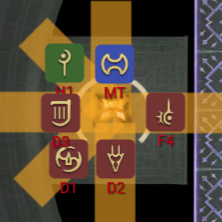
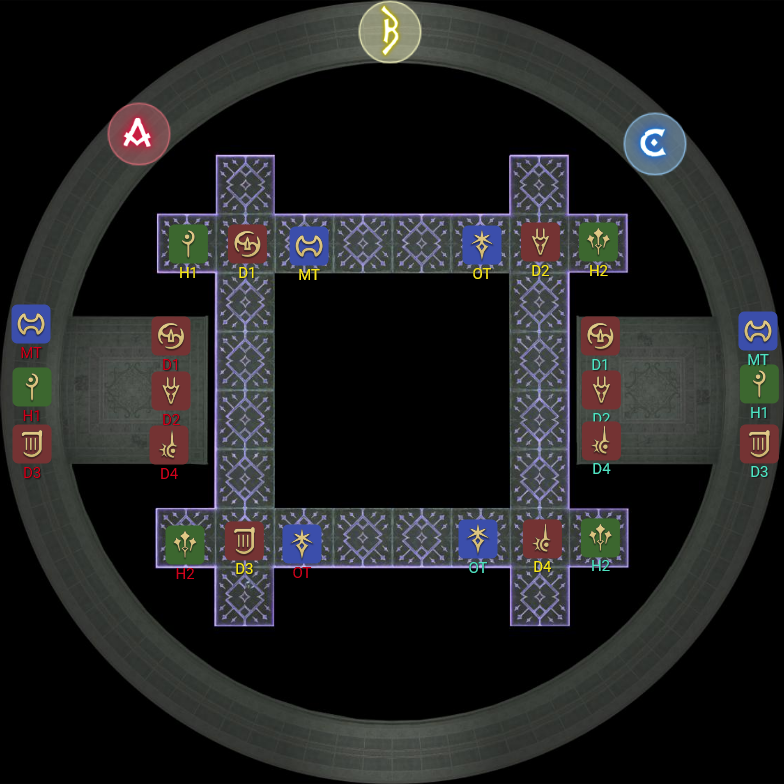
To resolve all mechanics in this phase and to evenly distribute roles across the arena, we begin with the positions shown in the image below.
Alliance A players are marked in red, Alliance B in yellow and Alliance C in blue.
Copy image link
TANK
Make sure to provoke your new target. Both here and after Looming Chaos.
HEALER
You may be resolving mechanics with a player that isn't in your Alliance and is out of reach of their own healers. Keep an eye on them and help them with targeted heals if needed.
From here, this guide will occasionally split between players on the outer platforms and players on the inner platforms. Be sure to read and understand both sides to have better knowledge of any repeated mechanics, as Looming Chaos may swap the platform you're on for the rest of the phase.
Third Art of Darkness - Each shadow will cast a 3-part sequence of attacks, telegraphed by the amount of glowing orbs she holds up each time.
1 Orb
2 Orbs
No Orb/Boss Glows
180° cleave on glowing orb's side.
Pair stacks on the 3 closest players.
Beam spreads.
A sequence will always be made up of 2 180° cleaves and 1 pair/spread.
Use the positions above to resolve, mirroring the positions of the pair/spread if on the East platform.
Resolve the pair stacks before crossing over to dodge a 180° cleave.
Particle Concentration - 3-player towers will spawn opposite of each other on the platform.
MT, H1 and D3 will take the tower that's either North or on the outer side of the platform.
D1, D2 and D4 will take the tower that's either South or on the inner side of the platform.
Copy image link
Inner Platform
Dark Dominion - A raidwide
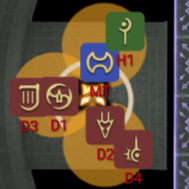
Particle Concentration - A 2-player tower and a 1-player tower will appear in each quarter.
Use the priority of Healer > Tank > DPS to fill the towers accordingly. If you're already in a tower, stay where you are.
After the towers resolve, Cloud of Darkness will then cast Ghastly Gloom, a donut or cross-shaped AoE depending on what shape the clouds form:
Donut - Outer players huddle against the inner wall of their platform, inner players occupy a tile close to the boss.
Cross - Outer players move Northeast/Southwest on the outer ring, inner players should occupy the 3 tiles in the corner.
Curse of Darkness will target all outer players with a debuff that when expires, shoots a protean in the direction they're facing. Simply face towards the wall/away from the party right before this expires.
Evil Seed - 2 players are targeted with a marker that drops a lingering puddle after some time.
Take these to the outer corners of the platform, before the outer ring.
Copy image link
Ghastly Gloom - This will be the opposite shape of what was casted before.
Thorny Vine - The lingering puddles will target the closest player to it with a tether that must be broken by running away.
DPS will pick up these tethers, with melee players taking the outer seeds and ranged players taking the inner seeds. Use the outer ring to create distance.
Copy image link
Flood of Darkness - Each shadow will cast an interruptible attack that does massive damage + a bleed to the entire raid if allowed to finish.
Tanks will interrupt these with Interject. Phys. Ranged players can also interrupt this with Head Graze.
Inner Platform
Evil Seed - 2 players East and 2 players West are targeted with a marker that drops a lingering puddle after some time.
Take these seeds to the East/West tiles, keeping the movement priority in mind and place them as shown below.
Copy image link
Ghastly Gloom - This will be the opposite shape of what was casted before.
Thorny Vine - 2 players will be tethered together which must be broken by running the full length of the platform.
Start by grouping together in your corner.
If you are tethered, use the movement priority and start running horizontally across the arena if you're the lower priority.
If you aren't tethered, make space for the tethered player on your side.
Copy image link
After Thorny Vine is resolved, an on-screen alert will appear signifying that Cloud of Darkness is charging an attack. This can either be 24 spread AoEs or 6 light party beams that target each healer.
If you see swirling black orbs around her, she is charging the spread AoEs.
If you see an orange glow around her, she is charging the light party beams.
Inner players should stack in their corner.
Outer players should stack on the platform, except for the D3 and D4, who should instead run along the outer ring to be in-line with the inner players' light party beams.
Cloud of Darkness will begin casting Active-Pivot Particle Beam, 2 line AoEs that fire East + West and rotate 90° either clockwise or counter-clockwise, with the final beams firing North + South.
Outer Platforms
Core-Lateral/Lateral-Core Phaser - Each shadow will jump to the outer East/West edge and perform a 2-part attack, sequentially cleaving her sides and front based on the cast bar.
Core-Lateral - She will cleave her front, then her sides.
Lateral-Core - She will cleave her sides, then her front.
Dodge appropriately, then move opposite of the rotation of Active-Pivot Particle Beam.
Excrutiate - Each shadow will cast an AoEtankbuster on the main threat.
Inner Platforms
Players will resolve the rotation staying on their East/West side.
Players at-risk of being hit by the beams' rotation will shuffle towards the safe North or South corner accordingly, "crossing" the initial danger zone and keeping the movement priority in mind.
Players not at-risk of being hit should make space by having the tank shuffle over, while the other two tuck into the corner spots.
As the beams resolve, players can shuffle back into their corners, like so.
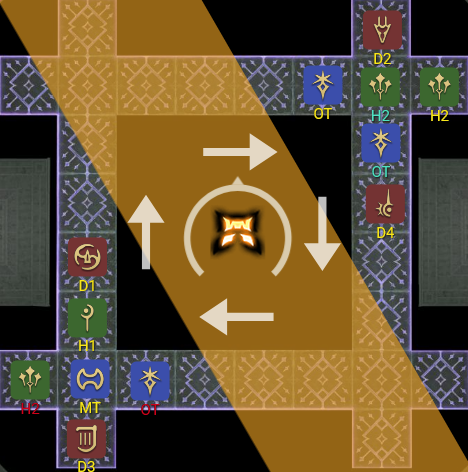
Looming Chaos will tether 2 players from across the arena and swap their positions. There's a general logic that we can use to our advantage to have as little impact as possible on roles and positions. The general logic is:
6 players on the inner platform will swap with each other, staying on the inner platform.
6 players on the inner platform will swap with the furthest 6 players from themselves.
6 players on the outer platform will swap with each other, staying on the outer platform.
This means there'll be about 12 players swapping platforms mechanically, from out to in and vice versa. This is why it's recommended to read both sides as mentioned before, to prepare you for any repeating mechanics you may not have done before the swap.
The positions we'll be taking look like this:
Copy image link
This is to ensure that the roles of the 6 players swapping out of the inner platform (2 tanks, 2 healers and 2 DPS) will stay consistent by swapping with the 6 furthest players away from them (the 2 tanks, 2 healers and 2 DPS on the East/West edge).
TANK
Remember to provoke your new target after swapping positions.
DAMAGE
If you were a DPS on the inner platform and were swapped with someone on the outer platform, you'll now be considered the D3 of that group for the rest of the phase, regardless of job. Keep this in mind when reading and looking at diagram positions.
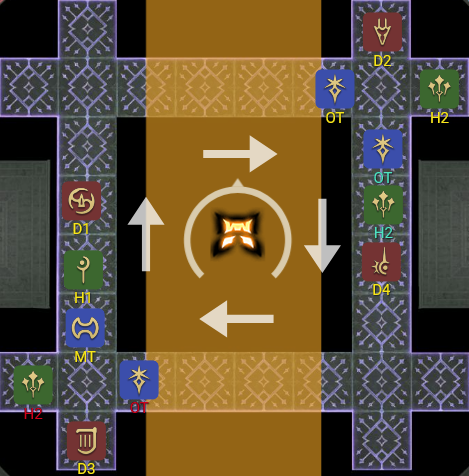
After the swap, the Stygian Shadows will cast Core-Lateral/Lateral-Core Phaser again, while Cloud of Darkness starts casting Particle Concentration again. Resolve the cleaves, then fill the towers.

 Copy image link
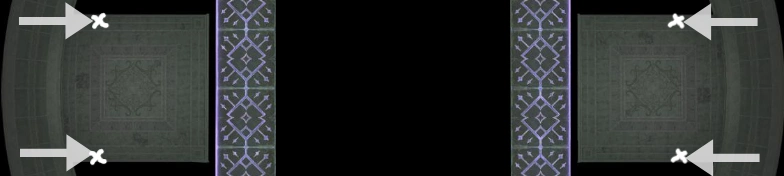 Copy image link
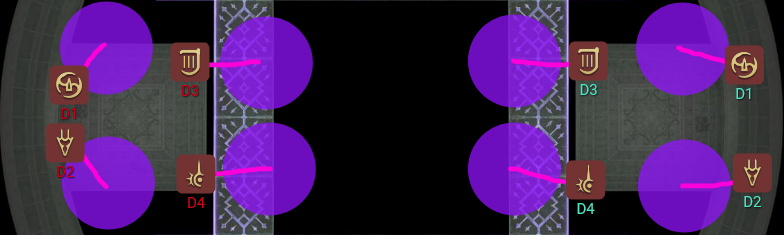 Copy image link
 Copy image link
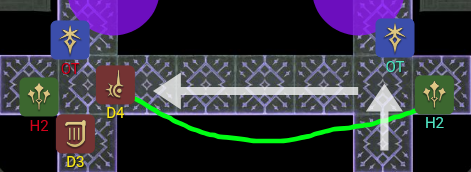 Copy image link
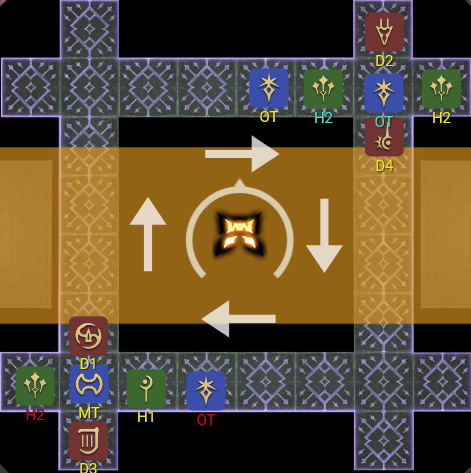
 Copy image link