
The Beginners Guide to Raiding
So your friends have convinced you to try raiding in FFXIV, or you are just curious about what it is all about. Welcome to the beginning of your raiding journey!
This guide is intended to be a helpful handbook for Warriors of Light who are looking to get into high-end content but are unsure where to start. We don't recommend necessarily trying to read this all at once, but save this page and come back to it as you need it.
NOTE
Some conventions in this guide will vary from region to region, but we have done our best to mention this where applicable. If you are unsure, it's always best to ask your party or static for clarification.
Quick Links
What is High-End Raiding in FFXIV?
High-End Duty content in Final Fantasy XIV refers to the most challenging instanced encounters in the game, designed for experienced players seeking difficult mechanics and rewarding loot. In order of relative difficulty, these include:
Unreal Trials: Revamped versions of older extreme trials, adjusted to the current level cap.
Chaotic Raids: Newer large-scale 24-man raids with complex mechanics based on older alliance raids.
Extreme Trials: Tougher versions of standard trials, often featuring unique mechanics and valuable rewards.
Savage Raids: Challenging versions of normal raids with complex mechanics and strict execution requirements.
Criterion Dungeons: High-difficulty dungeon content with unique mechanics and a savage mode for special cosmetics.
Ultimate Raids: The pinnacle of difficulty in FFXIV raiding, extra-long boss roulettes requiring precision, practice, and persistence.
These duties typically release in cycles alongside major patches and expansions, offering powerful gear, titles, and cosmetic rewards. Players can tackle them via Party Finder or by joining a Static Group, which is a dedicated team that regularly raids together.
TIP
If you are a new player who has never taken part in High-End Duty, we recommend starting with Extreme Trials as this is the best entry point to learn new systems and mechanics in a lower-stress environment.
Extreme trials will introduce you to the basics of party roles, mechanics, and the terminology used in raiding. This will give you a taste of what to expect in Savage and Ultimate raiding.
WARNING
As Unreal Trials and Chaotic Raids are generally more seasonal events, these are usually not considered an entry-point for new players getting into raiding and can be heavily cheesed.
Criterion Dungeons are not strictly raid content but function similarly to Savage Raids. They are designed for four players and have a normal and savage mode. The savage mode is considered high-end content and is similar in difficulty to Savage Raids.
Release Cycle
High-End Duty content in FFXIV follows a structured release cycle tied to major patches and expansions. Here's how it typically works:
| Content Type | Release Cycle |
|---|---|
| Extreme Trials | Usually launched on day one of an expansion or major patch as these are tied to MSQ releases. |
| Savage Raids | Released two weeks after a new expansion or major patch, allowing players time to complete the normal version first. |
| Ultimate Raids | Introduced several months after an expansion or major patch. Typically two ultimates will release per expansion. |
| Criterion Dungeons | Added in mid-patches, offering a fresh challenge between major content updates. Unpredictable as they were only recently added in Endwalker. |
| Unreal Trials | Updated periodically with most major patches, replacing older trials with revamped versions. |
Savage Raids are the core of FFXIV Raiding and release in three sets of four, known as Tiers. Each released on patch x.0, x.2, and x.4. Each Tier is made up of four Trial-like fights where you face off against a single boss.
PATCH NUMBERS
FFXIV patch numbers are formatted as x.yz where x is the expansion number, y is the major patch number, and z is the minor patch number. For example, 6.4 was the fourth major patch of the Endwalker expansion, while 6.45 came out a few weeks later with extra content and some minor adjustments.
Major patches are released every 3–4 months and contain new content, story, and features. Minor patches are released every few weeks after a major patch to stagger the major patch content out over the patch cycle.
Rewards
High-End Duties in FFXIV offer a variety of cosmetic and gear rewards depending on the content type. You will find a breakdown of the rewards for each type towards the end of this guide.
Raiding Concepts
Mechanics
Raid mechanics are the various abilities and attacks that bosses use during encounters. These mechanics can vary greatly from fight to fight, but there are some common mechanics that you will encounter in most high-end duties. Other mechanics are usually a combination of these common mechanics in unique ways.
| Abbreviation | Description |
|---|---|
| AoE | "Area-of-Effect" is a term often used to describe any mechanic or ability that impacts multiple enemies or players within a defined area. |
| Stack/Soak | "Stack" or "Soak" refers to a mechanic that requires the party or a certain number of players to gather together in close proximity to share damage inflicted by an attack or ability. |
| Spread | "Spread" signifies a mechanic that requires party members to spread themselves apart from each other to prevent overlapping damage or adverse effects. |
| Telegraph | "Telegraph" is a term used to describe visual indicators displayed before a mechanic or ability resolves. These indicators can include orange circles, lines on the ground, markers above player or enemy heads and any other visual cue that indicates an impending action. In more challenging content like Ultimates, some mechanics may not telegraph, meaning players have to rely on other cues such as the enemy's cast bar. |
| PB-AoE | "Point-Blank Area-of-Effect" typically denotes an enemy ability that generates a significant AoE damage area centered directly on the enemy itself. |
| Donut | "Donut" refers to a large donut-shaped AoE effect that surrounds the enemy, but with a safe zone in the center. |
| Defamation | "Defamation" refers to a large circular AoE centered on a specific player, requiring nearby allies to react accordingly. |
| Protean | "Protean" describes cone-shaped AoEs that target several or all players in a raid group, necessitating precise positioning and movement to avoid damage. |
| Exaflare | "Exaflare" represents a mechanic involving delayed, sequential attacks that move in a specified direction. Typically, only the first explosion is visibly marked, requiring players to anticipate subsequent movements. |
| Enumeration | "Enumerations (can be shortened to enums) describe mechanics that require a specific number of players to soak the damage or effects. Similar to "Stack/Soak" mechanics, but with a predetermined player count involved. |
The glossary page has a list of common mechanics and descriptions, but we also suggest exploring the guides on this website to see some other examples of different mechanics.
Role Positions
There are a handful of default positions that are commonly used in raids and are a good starting point for new players to learn. These will often be mentioned in party discussions and guides.
Job Roles
In an 8-man party, we typically organise the party members into the following role positions:
- Main Tank (MT)
- Secondary Tank (ST) - (aka: Off-Tank or OT)
- Healer 1 (H1) - Pure Healer (WHM or AST)
- Healer 2 (H2) - Shield Healer (SGE or SCH)
- DPS 1 (D1) - Melee DPS
- DPS 2 (D2) - Melee DPS
- DPS 3 (D3) - Ranged DPS (aka: Phys Ranged)
- DPS 4 (D4) - Caster DPS
It is common for Melee to call "D1" or "D2" preference when zoning into an instance - be sure to work this out before you pull the boss. D1 or D2 can also be replaced by another ranged or caster if necessary and this is often called "Fake Melee".
If you have at least one of each role in your party, you will also get a "Party Bonus" that gives you a +5% buff to STR/DEX/VIT/INT and MND stats.
TIP
This terminology varies across regions, typically OCE and JP use the D1 to D4 terminology, however, in other regions it may be replaced with M1, M2, R1, R2 instead.
Light Parties
Light parties are a way to describe the position of players in relation to two separate groups. This is commonly used in mechanics where the party must be split in half to perform a mechanic. The default light parties are:
- Light Party 1 (LP1): MT H1 D1 D3
- Light Party 2 (LP2): ST H2 D2 D4
Clock Spots
Clock spots are a way to describe the position of players in relation to a clock face. This is often used in mechanics where players need to spread out or stack together. The default clock spots are:
These positions are in relation to the default clock-spot waymarks. These are use commonly and are a great way to also start blind-prog in any fight. All raiders should be aware of their default clock spots.
IMPORTANT
Beware there are variations of these positions for some fights due to specific mechanics, such as the ultimate raid Futures Rewritten, where ST and H2 positions are swapped. It is important to check the fight guide for any specific changes to these positions.
Colour Partners
As an extension of clock spots, colour partners (or colour pairs) are a way to describe the position of players in relation to each other. This is often used in mechanics where players need to spread out or stack together. The default colour partners are based on your clock spots and the waymarks which are in the same positions (colours).
As per the image above, you will notice H1 and D1 are both in line with the purple waymarks. This means they are colour partners and some fights use these pairs for various mechanics.
- Red: MT D3
- Yellow: H2 D4
- Blue: ST D2
- Purple: H1 D1
Macros
Macros are a way to automate certain actions in the game, such as using items or abilities. They are also often used to quickly share information with the party, such as strats. In Materia, it is common practice to share a macro with the party at the start of a session to explain the strats the party plans to use.
■ Disco Inferno 1   ■ Fixed A/B
  G1 W | G2 E      H1 T
■ Ensemble Assemble    ★
  H1 MT ST H2      Dps H2
  D3 D1 D2 D4
■ Ride The Waves  ■ Frogtourage
  MT H1 ※Column  D3  D4
  D1 D3 T/M Inner MT  ST  D3MT  STD4
  D2 D4 H/R Outer D1  D2 H1D1  D2H2
  ST H2        H1  H2
Macros are provided by many guide resources such as the Materia Raiding guides on this website.
Waymarks
Waymarks are markers that can be placed on the ground to help players navigate and position themselves during encounters. They are often used in conjunction with macros to provide visual cues for mechanics or party positioning.
Waymarks are generally specific to a strategy and are provided alongside other resources such as in the raid guides provided by Materia Raiding.
TIP
These waymarks can be imported into the game using the Waymark Import addon, or you can ask a friend to import them so you can save a copy for yourself.
Burst Windows (2mins)
Burst window is a term commonly used to refer to a period of time when the party aligns party buffs and cooldowns for maximum damage output. This is usually done at the start of a fight and at regular 2-minute intervals throughout the encounter. Some jobs will also have a 1-minute burst window, but these are generally handled automatically between the 2-minute windows.
To get the most damage out of your job, you may hold some cooldowns to ensure they align for an upcoming burst window.
2-minute burst windows may be deliberately delayed to align with downtime or other mechanics. It is important to communicate with your party about when these windows will occur.
Potions (Pots) are consumables that temporarily increase your stats and will typically be used in line with the first burst window and the later usages will be delayed to align with another burst window later in the fight. Most Savage Raids will include at least two pot windows, with some fights and Ultimate Raids having three or more.
Mitigations (Mits)
Damage mitigation is a crucial aspect of high-end raiding, as it helps reduce the amount of damage taken by the party during encounters and to survive certain mechanics.
Tank mits: Tanks have a variety of abilities that can reduce damage taken by themselves and the party. Tanks will also need to coordinate their mitigations to deal with tank busters and other mechanics that require them to take significant damage alone.
Healer mits: Healers have a number of party-based and targeted mitigations. Shield healers have the most options here, but all healers have some form of mit that can help the party.
DPS mits: DPS roles have a number of targeted and party-wide mitigations such as Feint, Addle, and other job-specific abilities. These should be rotated through the fight to help reduce overall damage taken by the party.
TIP
Mitigations that target an enemy such as Feint, Addle and Reprisal reduce the enemy's damage dealt rather than the damage taken by the party. This is important as for some fights, damage from certain mechanics does not come from the boss (e.g. it comes from an untargetable add), therefore targeted mitigations will not work. For those instances, party-wide mitigations is crucial instead.
- Personal Defensives (Personals): Many jobs have personal defensive abilities that can be used to reduce individual damage taken or heal themselves up. These should be used during high-damage phases or mechanics to help keep the player alive and reduce healer workload. Do not be afraid to use these - they are there to help you survive and keep the party alive. Your healers will appreciate it.
A Mit-plan is a plan that outlines when and how to use damage mitigation abilities during a fight. This can help ensure that the party is prepared for high-damage phases and can survive difficult mechanics. This can vary greatly with party composition and the fight itself, so it is important to discuss this with your party before the fight begins.
TIP
FFXIV Fight Line is a great tool for creating a Mit-plan for your party. It allows you to create a timeline of the fight with premade templates of existing encounters. This can help ensure that everyone is on the same page and knows when to use their cooldowns.
Instances
Instances are the areas where you will be doing your High-End Duties. These are separate from the open world and are designed to be completed with a party of players.
An instance will have a timer that will depend on the type of High-End Duty:
- Extreme/Unreal: 60 Minutes
- Savage 1–3/Chaotic/Criterion Normal: 90 Minutes
- Savage 4/Ultimate/Criterion Savage: 120 Minutes
At the end of the timer, the instance will close, and you will be returned to the open world. This will boot you from an instance even if you are in combat.
Most groups refer to the full-timer duration as a "Lockout" and your static might say they are doing "2 lockouts" or "3 lockouts" of a fight. This means they are doing two or three full runs of the fight before calling it for the day.
NOTE
The "lockout" terminology is also used for the weekly lockout of Savage Raids and loot, which will be explained in more detail later. Beware of this and understand they are different things.
Phases
Phases are used to describe portions of a fight that have different environments or where the boss changes form. Savage Raids will usually only have one phase except the last fight of a tier, which will have two distinct phases. Ultimate Raids generally have 5–6 phases, with each phase being like a mini-savage in itself.
Some raids will have a checkpoint where you can wipe and start future pulls from a later phase. These are most common in the last fight of a Savage tier and are often referred to as "door bosses."
Phases are helpful for breaking down a fight into manageable chunks and allow you to focus on one part of the fight at a time. This is especially useful for new players who may be overwhelmed by the number of mechanics in a fight.
Encounter Naming
The FFXIV community generally will not use the full name of an encounter to refer to it and have abbreviations for simplicity.
For current expansion Extreme Trials, they are numbered based on the order of release. So, the first Extreme Trial of an expansion would be EX1, the next EX2, and so on. For older expansions, they are generally referred to as <boss name> EX.
Normal and Savage Raid fights use a 3-part naming scheme. The first is a letter unique to the expansion tier, the second part is a number referring to the boss order from 1 to 12 and the last part is either "N" for normal or "S" for savage. For example, the first savage fight in the Endwalker expansion's full name is "Pandaemonium: Asphodelos - The First Circle (Savage)." We shorten this to "P1S". The second savage fight is called "P2S," and so on. The prefxies for each expansion are:
| Expansion | Prefix |
|---|---|
| A Realm Reborn | T (Bahamut raids were numbered by Turns) |
| Heavensward | A (Alexander) |
| Stormblood | O (Omega) |
| Shadowbringers | E (Eden) |
| Endwalker | P (Pandaemonium) |
| Dawntrail | M (Arcadion Match) |
Ultimate Raid and Criterion Dungeon names are abbreviated based on the actual full name of the encounter. For example, the Ultimate Raid "The Epic of Alexander" is referred to as TEA, while the Criterion Dungeon "Another Sil'dihn Subterrane" is abbreviated to ASS. Chaotic Raids are new to the game but will also likely follow this type of abbreviation as more are added.
Glossary
You can find more common terms and definitions in the glossary page,
GlossaryHow to be a good Raider
Being a good raider is not just about knowing your job and mechanics, but also about being a good team player. This topic will get into some more advanced concepts, terminology, and tips that will help you become a better raider.
Raid Etiquette
Be on time: Be available at the agreed time. If you are running late, let your party know as soon as possible.
Communicate: Use voice chat or text chat to communicate with your party. Let them know if you are having trouble with a mechanic or if you need help.
Be respectful: Treat your party members with respect and kindness. Avoid being rude to others. Give everyone a chance to speak and share their thoughts. A healthy atmosphere is important for a successful raid.
Evaluate yourself regularly: If you are consistently causing wipes or falling behind, it may be time to reevaluate your performance and ask for help. If you are not willing to improve, you may be blacklisted from future parties.
Be open to feedback: If someone gives you constructive criticism, take it to heart and try to improve. Everyone makes mistakes, but it's important to learn from them.
Avoid getting tilted: If you are having a bad day or are frustrated with the fight, take a break and come back when you are in a better mindset. Getting tilted can lead to further mistakes and frustration for everyone involved.
Prog Mentality: Focus on learning a mechanic first before optimising your DPS and rotation. Understanding and building confidence with a mechanic will lead towards better performance overall. This is especially important in Savage and Ultimate content where the mechanics are more complex and require more focus.
In smaller communities, bad behaviour can lead to being blacklisted from future parties. Admitting fault and apologising can go a long way in repairing relationships. If you are blacklisted, it may be difficult to find parties in the future.
Understanding your Job
Know the Game Systems
Understanding the game's engine and combat system can have a large impact on your performance:
GCD: The Global Cooldown is the time it takes for your character to perform an action. Most jobs will run a GCD speed close to the default value of 2.5 seconds, however, some jobs either have passive skills or use Skill Speed, Spell Speed, or Food to lower this value. Understanding how the GCD works and how to optimise it is crucial for maximising your damage output.
oGCD: Off Global Cooldown abilities are abilities that do not trigger the GCD and can be used at any time. These abilities can be used to fill the gaps between GCDs. Using oGCD abilities between GCDs is called "Weaving" and is a key part of maximising your damage output. You can typically fit up to 2 oGCDs in between each GCD, but this can vary depending on your job and if any skills have a cast time. Fitting 1 oGCD is called Single Weaving, while fitting 2 is called "Double Weaving".
TIP
You will notice all skills in the game are labelled as "Weaponskill", "Spell," or "Ability."
- Weaponskills and Spells are GCD.
- Abilities are oGCD.
Queueing & Clipping: The game allows you to queue your next ability while the GCD is still on cooldown. This means you can press your next ability before the GCD is finished and it will automatically trigger when the GCD is over. The queue window is about 0.5s before the end of the GCD cooldown. This is important for maintaining a smooth rotation and avoiding clipping. The queue is server-side, which means that the ability occurs instantly after the GCD finihes and allows you to achieve zero downtime between abilities. Most abilities can be queued - however, some abilities cannot be queued and will require you to wait for the GCD to finish before using them. The delay that occurs after the GCD finishes and when the next input is registered on the server is called "Clipping" and can lead to a loss of damage if not managed properly.
Snapshots: Snapshots are a reference to how the game handles events from the server-side. The game bundles events together every few seconds and processes them as a batch. This can result in some unexpected behaviours when using certain abilites or most commonly when avoiding mechanics. You might visually avoid or dodge a mechanic before the visual indicator ends, however, if the game has already processed the event, you will still take damage.
Joonbob has a fantastic video that includes video examples of all the above topics:
Some plugins can help with common issues with latency and clipping. These can help greatly with tight DPS rotations when you have high ping or are on a low-end PC. These plugins are not required but can help with your performance.
- NoClippy: A plugin that helps with clipping issues by adjusting your GCD and ability timings. This can help you maintain a smoother rotation and avoid clipping abilities on high-latency connections.
GCDs and Uptime/Downtime
Rule #1 is "Always be Casting" or keep your GCD rolling. This means you want to always keep your GCD "spinning". Any time your GCD is not moving is considered downtime and should be avoided. Using the correct GCD abilities comes next and this is your "rotation".
Uptime is the effective time you are able to deal damage during an encounter and keep your GCD rolling. Managing uptime will lead to better overall damage output and can involve multiple factors such as:
Positioning: Make sure you are in the right position to achieve positionals and stay in range of the boss - this is especially important for melee DPS jobs. If you are a ranged DPS or healer, make sure you are in range of the boss and other party members to receive any party-wide effects.
Forced Downtime: Many encounters will have downtime periods where the boss is not targetable or is moving around the arena. Make sure you are aware of these periods and adjust your rotation accordingly - this may involve using non-damaging abilities to fill the gaps or ranged attacks to maintain uptime.
Cast Times: If you are a Caster or Healer, keep in mind your movement speed and cast time. Make sure you can avoid mechanics while still dealing damage.
SLIDECASTING
Slide-casting is a technique used by casters to move while casting spells. When casting an ability that requires you to stand still, you can safely move within the last 0.5 seconds of the cast duration. This will not cancel the cast and can help you maintain uptime while avoiding mechanics. For Casters, it is important to practice this technique to ensure you can use it effectively in raids.
This works due to server-side snapshots where the game has effectively already "finished" the cast when the GCD has less than approx 0.5s remaining. This window will be ping-dependent and may vary from player to player.

This image shows an example of the slide-cast window, moving when the cast is within the last 0.5 seconds will not cancel the cast.
Rotation and Burst Windows
Your rotation is made up of three components: your opener, your core / filler rotation, and your burst window. The opener is the order of actions and cooldowns you will use from the beginning of the fight, while the core rotation is the order of abilities you will use throughout the fight.
Your burst windows are the periods of time when you will use your abilities and cooldowns to maximise your damage output. These are usually aligned with the party's burst windows and are generally on a 2-minute cycle from the start of the fight.
The best resource for learning your job is The Balance Discord. This is a community of players who share information about job rotations, openers, and performance analysis. Here you will find comprehensive guides for all jobs and their rotations.
Visit the Balance WebsiteExample of an opener for Ninja:
Utilities
Certain jobs have utility abilities that can be used to help the party or themselves. These can be unique tools specific to certain jobs or common utilities found across a role. The core utilities are:
- Resurrections: These are abilities that allow healers and some caster jobs to revive fallen party members. These have no cooldown but have a long cast time without Swiftcast and are expensive on mana. Revived players will have a debuff that also significantly reduces their damage output.
- Tank Invulnerability: Each tank has an ability that allows them to temporarily mitigate any amount of damage for a short period of time. These have a very long cooldown and work slightly differently for each tank job.
- Rescue: Healers all have a rescue ability that allows them to pull a party member to their location. A good healer can use this to save another party member from a mistake or quickly reposition them for a mechanic.
- Gap Closers: These are movement abilities that allow players to quickly close the gap between them and the boss. This is especially important for melee DPS jobs who need to be in range of the boss to deal damage.
Reviewing your performance
After each raid, take some time to review your performance. This can help you identify areas where you can improve and become a better raider. Here are some tools you can use to review your performance:
Stone, Sky and Sea: This is a built-in tool in the game that allows you to review your damage performance against a target dummy with similar checks to a Savage Raid fight. if you can kill it, use the time left on the encounter as a gauge of your damage. If you can't kill it, you might need to work on fixing your rotation and burst window usage. If you can effectively pass the SSS trials with plenty time to spare, you are likely ready to tackle the damage requirements for the fight. You can find out how to unlock this content here.
Record Yourself: Recording your gameplay can help you identify areas where you can improve. You can use software like OBS or Shadowplay to record your gameplay and then review it later.
The Balance: The Balance Discord is a community of players who share information about job rotations, strategies, and performance analysis. You can ask for help with your rotation or performance in the individual job-specific question channels.
Third-Party Tools
Some of these tools are considered third-party tools and may violate the Terms of Service of Final Fantasy XIV. Use them at your own discretion.
FFLogs: A popular tool for analysing raid performance. FFLogs allows you to see in-depth statistics about your performance. Key areas to look for are:
- rDPS: This is the damage you dealt, including all damage due to buffs you provided other players.
- Uptime: This is the amount of time you were able to deal damage during the fight and keep your GCD rolling.
Xivanalysis: Used with FFLogs, XIVanalysis is a tool that provides detailed analysis of your logs. You can see how you performed in different areas, such as uptime, rotational mistakes, buff usage, and more.
Note
FFLogs requires someone in the party to be using the ACT (Advanced Combat Tracker) app to export logs and FFLogs Uploader app to upload them. This is not a requirement for all parties, but it is a good idea to ask if you are in a static or log for yourself if you are in a PF.
Preparation
Prior to instancing into a raid, there are several things you need to prepare for - gear, consumables and studying for the encounter you intend to do (unless you have joined a "blind" PF or static).
Gearing up
There are three primary gear sources for high-end content:
- Crafted Gear
- Raid Gear
- Tome Gear
Crafted Gear is introductory gear and is generally the minimum needed to start raiding. Tome and Raid gear will then replace this to make up your BiS (Best-in-Slot) gear for the current savage tier. You can craft it yourself, buy it off the Market Board, or have someone else craft it for you
Raid gear is looted from savage encounters and is the highest iLvL gear at the time of each tier.
Tome gear is available from the vendor in the main city for each expansion and is obtained by exchanging tomestones, which are obtained from various sources. Tome gear can be upgraded to the same iLvL as raid gear with upgrade tokens that are also looted from the savage encounters.
TIP
Alliance raids also provide a catch-up gearing system where once per week you can obtain a token that can be exchanged for tome gear upgrade tokens. Be sure you complete the current alliance raid weekly to get these tokens.
If you are raiding at the beginning of a Savage tier, you want to be wielding the newest crafted gear that is overmelded with as many materia as you can achieve (ideally five). You may have some pieces from the Extreme / Normal raid, and as you obtain tome and raid gear you can replace the lower iLvl piece. You should aim to have your gear fully melded before joining a raid party in Party Finder.
The Balance Discord will provide you with information on your job's Week 1 BiS, as well as the final raid BiS.
TIP
BiS or Best-In-Slot gear is the best possible gear you can obtain for your job at a given time. This is usually determined by the community and is often updated with new patches. There are typically multiple BiS sets for a job, depending on the player's preferred GCD timing.
If for some reason you absolutely cannot achieve Week 1 BiS and intend on doing early prog:
- If you are in a static, let them know. How they choose to handle that is up to the static.
- If you intend to PF, please respect other people's time and do not join parties with undergeared and unmelded jobs. People want to give themselves the best chance to progress and having bad gear will undermine that.
If you begin raiding later in the tier, as long as you are fully melded with current tome, crafted or normal raid gear, that is acceptable.
Gearing for older Ultimate Raids strongly depends on how long it has been since its release. However, if you wish to tackle an Ultimate Raid while it is current content, you MUST be in fully melded final BiS gear for that tier, which as mentioned is available on The Balance Discord.
Weapons
Each raid tier drops a weapon for all jobs on the last boss (almost always BiS), therefore, you will need to get a weapon from somehwere else to use during the raid tier. There are three options here:
- Extreme Trials Weapons: The last trial before each raid tier drops a weapon for all jobs that is generally the best option going into a savage raid tier.
- Crafted Weapons: As with crafted armour, you can craft or buy a crafted weapon, however these are lower ilvl than the Extreme Trial weapons.
- Tome Weapons: These will become available partway through the tier as they require a token dropped from the third boss or at least 7 kills of the last boss in Normal mode plus 500 tomestones. These are an undesirable option as they consume tomes which are a limited resource and generally get replaced not long after by raid weapons.
Melding
Melding gear is attaching materia to your gear for bonus stats. Anyone can meld up to two materia to most gear with the use of a Materia Melder NPC.
Overmelding is a process that allows you to add additional materia to your gear beyond the normal limit of 2 and is only available for crafted gear. This is important for maximising your stats and performance in high-end content for early prog. The first 2 meld slots are guaranteed, but the 3rd, 4th, and 5th slots are not guaranteed and can fail.
Here are some boots overmelded with five materia:
To overmeld your gear:
- You must have 1 Disciple of the Hand (crafter) job at max level as this allows you to meld your own gear.
- You must complete this full quest chain that eventually teaches overmelding.
OR
- You can borrow the services of a crafter who has already unlocked overmelding themselves. Be sure to give them a tip for their time and effort.
As overmelding gear is a gambling process, you will need a lot of materia. Regularly attending A rank hunt trains (which you can track in the Faloop Discord) is the best way to obtain clusters (which you exchange for materia). Otherwise, your other immediate option is to buy them from the Market Board, which becomes expensive very quickly.
Consumables
You must have current high-quality food up and running during a raid. Food buffs give you extra health and a boost in 2 specific stats - they last 30 minutes (40 with FC buffs and 45 with a manual). The ideal food for your job is information available on The Balance Discord.
You must also carry current high-quality potions (pots) with you. At the time of writing, pots are known as "Grade 3 Gemdraught of <stat>," and the Grade number will increase with new major patches. Check what main stat your job uses (Strength, Mind, Dexterity, Intelligence) to know which type of potion stat to buy.
For Extreme Trials and Savage Raids, you are not expected to use them during early prog and can save them for final mech prog / A2C / reclears. For Ultimate Raids, especially on-content encounters, it is expected that pots are used even during prog at specific points to meet a phase's DPS check. Individual encounters may have unique pot windows but in general, use them when available at the beginning of a 2-minute burst window.
People can see if you are not using your consumables so don't try to get away with this.
You can craft these consumables yourself, have someone else craft them for you or buy them from the Market Board.
Studying
If there are resources available and agreed strategies to resolve mechanics for a particular encounter, it is paramount to be familiar with them before instancing into the encounter. Of course, it is normal to make mistakes while physically executing the mechanic for the first time, but do not come into raid without having an idea what you are supposed to do.
Your static may provide you with the resources you need for studying, but many statics try to match Party Finder strategies for compatibility. For OCE Party Finder strategies, the Materia Raiding Website has resources including raidplans / toolboxes (visual diagrams of how to resolve a mechanic).
TIP
Each region generally has their own strat resources, so be sure to check your region's resources for the most up-to-date information.
- OCE Strats: Materia Raiding
- JP Strats: Game8
- NA Strats: Aether PF Strats
- EU Strats: (Generally Hector strats, no single website at this time)
WARNING
If you are jumping into PF week 1, expect strats to change multiple times and regularly check your region's resources until strategies are 100% set in stone.
Studying goes beyond simply looking at raidplans - POVs are essential to put these diagrams into context. Do your best to understand why the mechanic plays out the way it does - having a proper understanding of the mechanic (as opposed to looking at the raidplan purely to understand where to stand) will make you a better and more competent raider.
As mentioned before, it is disrespectful to other party members and their time to show up underprepared so please study adequately.
How much you need to study depends on the encounter itself or static expectations. Generally speaking, you want to study at least 1 phase ahead of your prog point. Again, the definition of a phase will depend on the encounter itself, but just study as much as possible!
The only exception to a study requirement is if you are in a blind group or static (i.e. the party intends to solve the encounter themselves without any resources)
Finding a Party
There are two ways you can get a party together for High-End Duty content.
- Form a Static: A group of players who raid together on a regular schedule with the same roster.
- Use Party Finder: Temporary improvised parties formed using the in-game party finder tool.
There are pros and cons to both approaches; this will ultimately depend on your own availability, commitment, and goals.
What is a Static?
A static is a dedicated group of players who regularly play together to tackle high-end content like Savage Raids, Criterion Dungeons, and Ultimate Raids. Instead of relying on Party Finder, statics provide a consistent team with established schedules, strategies, and goals.
Statics are generally only used for the most challenging High-End Duties, as these do require consistency and regular practice to clear reliably. Most statics will form a few weeks or months prior to the release of a new Savage Raid tier or Ultimate Raid.
A static might follow the region's standard Party Finder strats or may use their own developed strats for a fight. This is entirely up to how the static wishes to run.
A good static will be reliable and guarantees you will get all the clears and loot you need eventually.
TIP
The best way to find a static is to join your region's Party Finder Discord servers.
For Materia players, use the Materia Raiding Discord and check the following channels:
- #looking-for-members: Groups that are advertising open spots for members to join.
- #looking-for-group: Players advertising they are looking for a static to join.
Managing expectations
When setting up a static, the most important thing to do is to ensure all members have the same expectations for the party. Static groups are generally classified in 3 levels with vastly different expectations of time commitment, skill level, and work:
- Casual: a more relaxed approach with no or few firm expectations.
- Midcore: a strong group that generally get together 3-4 days a week to clear content efficiently, but without high pressure expectations.
- Hardcore: groups that send longer hours and more days with the goal clearing content within a fast timeframe (e.g. clearing the full Savage tier in the first week of release).
NOTE
These are just general guidelines - exact scheduling and expectations will vary from group to group.
Statics often fall apart when groups don't communicate the expectations properly beforehand.
Party Finder
Party Finder is an in-game tool that can be a useful tool for finding a group, depending on your region. Party Finder lets you advertise a party for a specific duty, and players can join your party if they meet the requirements. This is a great way to find groups for high-end content if you want to progress at your own pace and schedule.
To find the right group, it is important to understand the terminology that is often used for Party Finder listings:
| Terminology | Meaning |
|---|---|
| Fresh | This group is starting the fight or mechanic fresh and is open to unexperienced players |
| "mech" Prog | This group is currently progging a specific mechanic and looking for other players to also learn this mechanic and prog past it. |
| "mech" Cleanup | This group is finishing progging a specific mechanic and are looking for players up to the same point in the fight. Do not join if you have not learnt this specific mechanic yet. |
| A2C | This group has progged all the mechanics and are looking for players who are ready to clear the fight. Do not join if you are still progging mechanics. |
| C41/C4x | This group is doing a clear of the fight with only 1 or X players who have not cleared before. |
| Blind | This group is not studying the fight and going in without any prior knowledge, let them work it out themselves. |
| Need WM/Macro | This group is looking for someone who can bring their own Macros or Waymarks to share with the group |
| MR Strat | This group is using strats specifically from "Materia Raiding" community, this might be replaced with other strat names |
| 3x runs | This group is looking to kill the boss a certain number of times to farm loot, often seen with extreme trials |
| L>R/FFA | This group is using a specific loot Order to assign loot. |
WARNING
Do not join a party for content you have not progressed up to yet. Joining groups beyond your current prog point will inevitably cause unnecessary wipes, waste others' time and could harm your reputation within the raiding community.
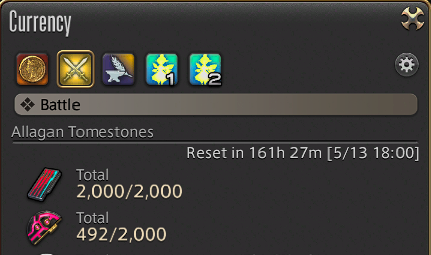
Rewards
Many loot rewards from various battle content have weekly limits. For reference, these weekly limits reset every Tuesday UTC+00:00 (18:00 AEST | 19:00 AEDT). You can check the "Battle Tab" in your currency interface in-game to see the exact time till the next reset converted to your timezone:
Raid Loot Systems
Each raid type offers different types of loot.
| Content Type | Reward |
|---|---|
| Savage Raids | Offers the highest iLvl gear pieces for the current tier, plus material that will upgrade tome gear. More detail will be provided on Savage loot below. |
| Extreme Trials | Drops weapons or accessories (depending on the fight) suitable for pre-BiS gearsets. Also has rare chance to drop a unique mount, orchestrion and / or crafting material. Each clear provides 1-2 totems (amount depending on the fight) that can be exchanged for the gear drops and after 2 major patches, the mount. There is no weekly reward limit. |
| Ultimate Raids | A clear gives 1 totem that can be exchanged for a cosmetic weapon. While current content, the weapon may be BiS and players are limited to 1 totem per week. This weekly cap is lifted on the next major patch after release. |
| Criterion Dungeons | Gives unique tokens that can be used for unique glamour pieces and other miscellaneous cosmetic / registrable items. The latest Endwalker Criterion Savage also provides cosmetic weapons. This is still relatively experimental content for the game, so a baseline for rewards is not set in stone. |
| Chaotic Raids | Offers gear with equivalent iLvl to current Savage tier. Also may drop unique registrable items and cosmetics. Each clear provides tokens that can be exchanged for the aforementioned rewards. This is still new content for the game, so the baseline for rewards may change. |
| Unreal Trials | A clear grants a round of Faux Hollows (Faux Commander in Idyllshire at X:5.7 Y:6.1), a simple minigame where you uncover illustrations to receive Faux Leaves. You can play up to 2 rounds of Faux Hollows (i.e. 2 clears) per week. Note that you need to play the minigame before moving to your 2nd reclear (also known as a retell). Faux Leaves are a currency used to buy unique minions, mounts and glamour pieces. |
Weekly Savage Lockouts
NOTE
Don't confuse this term with 'instance timer lockout.'
When you clear a Savage Raid boss, your party will recieve a number of loot items based on how many party members were eligible for loot.
- 8 players = 4 loot items (also known as 2 chest)
- 4-7 players = 2 loot items (also known as 1 chest)
- 1-3 players = no loot (also known as no chest)
Each player character is eligible for loot once per week per savage boss. You can repeat the fight as many times as you like, but you will reduce the amount of loot that drops for the party, and you are ineligible to receive any loot after your first kill of the week.
You should aim to clear each boss with a full party of 8 eligible players to maximise loot. Statics will have this expectation already, but if you are using Party Finder, you will have the best chance to do this early in the reset week (ideally Tuesday evening and Wednesday).
You will also receive one "book" per week for each boss you kill regardless of loot lockout. Multiple books can be exchanged for a raid drop of your choice from a vendor in one of the expansion cities.
Each boss in a Savage tier must also be cleared in sequence to receive the weekly loot. If skip a boss, you relinquish your eligibility for a book and loot on the bosses you skipped over.
TIP
Some groups will do "any chest / book runs" at the end of the week to get a book regardless of loot eligibility. This is a great way to still get your weekly book if you left your reclears late in the week.
The weekly Savage loot lockout is removed towards the end of the major patch cycle, allowing players to farm the Savage Raid for loot without any restrictions.
Loot Order
If you are in a static, how loot is assigned every week is entirely up to the group. Some groups may choose to funnel gear to DPS, some groups try to evenly distribute gear between everyone. Just don't do any reclears outside of your static until the end of your scheduled week, otherwise you will screw over the rest of your team's potential loot for that week.
If you are in a Party Finder and successfully clear a fight, there are 2 main ways to assign loot. The party leader will often state their preferred loot assignment in the Party Finder description and if not, just ask.
- L > R (left to right): only one item is rolled at a time, starting from the first (leftmost) loot in the list and going right. Players are only permitted to win 1 item - if you win an item, pass on the remaining loot and leave the instance.
- FFA (free for all): anyone is free to take anything.
Other Resources & Tools
- Materia Raiding - The home of Materia Datacenter strats and resources for raiding in Oceanic.
- The Balance - Comprehensive guides for all jobs, rotations, openers, and BiS info.
- FFLogs - A tool for analyzing raid performance and logs. This is a great way to see how you are performing in raids and where you can improve.
- XIVanalysis - A tool for analyzing your performance in raids by reviewing your logs.
- Raidplan - A tool for creating and sharing visual raid plans and strategies.
- FFXIVFightline - A tool for creating a Mit-plan for your party.
Credits
This guide was written by Em and Noz with contributions from the Materia Raiding Community.
Have feedback? Reach out to us in the Materia Raiding Discord in the #feedback or #materia-website channels.