Credits
- Toolboxes by Pipiro Piro
- Macros, Waymarks and Cheatsheet by Materia Raiding Discord
Toolbox
By Pipiro Piro
Toolboxes are an interactive guide that allows you to click through each phase indiviudally and review the mechanics in a easy to understand manner.
Macros
By Materia Raiding Discord
Phase 1
Macro - Tank Invuln + Light Left Red Right (LLRR)
■【1st Paradeigma】- Tank Invuln
■【2nd Paradeigma】
  Line Extend to Opposites Sides
  Tower Debuff - TH : CW, DPS : CCW
  ※ Tether End Point Relative
■【Super Chain Theory 1】
    D1 D2
  MT     ST    MT/D1      ST/D2
     ●          ●
  H1                H2    H1/D3       H2/D4
    D3 D4
 ※ Light Left Red Right ※ Use pair spread
 (R) Beam   (L) Beam   for AOE discard
 (L) Debuff (R) Debuff   location
■【3rd Paradeigma】
  North : 十 South : X W  MT>ST>H1>H2  E
  DPS Towers: Straight 》 Inside, Crossed 》 Outer
■【Limit Cut】
    2/4   ※Rotate CW
  5/7         6/8  to resolve Puddles
    1/3
  ※Laser Order: 5/7 》 6/8 》 1/3 》 2/4
■【Super Chain Theory IIA】
  MT/D1
    ST/D2   ※Use same spread as
  ●       【Super Chain Theory 1】
    H1/D3
  H2/D4
Macro Variation - Normal【1st Paradeigma】
■【1st Paradeigma】- TH 1st, DPS 2ndMacro Variation - White Debuff Right【Super Chain Theory 1】
■【Super Chain Theory 1】
    D1 D2
  MT     ST    MT/D1      ST/D2
     ●          ●
  H1                H2    H1/D3       H2/D4
    D3 D4
 ※ Black Left White Right ※ Use pair spread
 (W) Beam   (B) Beam     for AOE discard
 (B) Debuff   (W) Debuff   location
Macro - Limit Cut Reminder
■【Limit Cut】- Boss North
    2/4   ※Rotate CW
  5/7         6/8  to resolve Puddles
    1/3
  ※Laser Order: 5/7 》 6/8 》 1/3 》 2/4
Phase 2
Macro - AG3 Pangenesis + Gaia 2 Tether Pairs
■【Gaiaochos】&【Ekpyrosis】
TH: W-NE DPS: E-SW
D1 D2 MT ST MT D1 D2 ST
MT ST D1 D2 D3 H1 H2 D4
H1 H2 H1 H2
D3 D4 D3 D4
■【The Classical Concepts】- BPOG
W ← → E α: β:
■【Caloric Theory 1】
H2 ※ Beacon on D/B
D3 H1 ※ Fire: MT ST H1 H2 》 North CW
D4 ※ Fire: D1 D2 D3 D4 》 West CCW
※ 2nd Fire: A/C move CW if same
■【Pangenesis】※ Blobs → N/E
MT ST H1 H2 D1 D2 D3 D4
※ Nothing step forward, 1 Debuff step back
1st Short + Nothing ※ Long + 1 combine
2nd North: Short + Nothing South: Long + 1
3rd New debuff → cross
■【Caloric Theory 2】
D1
MT D2
D3 ※ rotate CW
ST D4 ※ 7th don't pass to 8th, just move out
H1
H2
■【Gaiaochos 2】
【Demi Parhelion】: Move > MT/D1 ST/D2 H1/D3 H2/D4 > Stay
【Summon Darkness (Tethers)】※ Nothing: follow pairNote: AG3 is currently the most popular and easiest to execute. However, it does not seem to follow the rules set out by the mechanic itself; Although unlikely there may be a potential hotfix to address this method.
Macro Variation - Proper Pangenesis Toolbox: https://ff14.toolboxgaming.space/?id=042195969448861&preview=1
■【Pangenesis】※ Blobs → N/E
  MT ST H1 H2 D1 D2 D3 D4
  ※ 1 Debuff step forward, No Debuff step back
  1st        Short (14s) + 1
  2nd      North: No Debuff South: Long (19s)
Macro Variation - First Tether Stays
■【Gaiaochos 2】
 【Summon Darkness (Tethers)】
  MT/D1: N  ※ Tether first:
  ST/D2: NE   Stretch > Stay
  H1/D3: E  ※ Nothing first:
  H2/D4: SE   Fixed position > Stretch
Notes
Toolbox by Pipiro Piro Classical Concept order BPOG
- Blue ✖
- Purple □
- Orange(Red) ◯
- Green △
Echo Strat Alternative
Using Echo strat for Caloric Theory 1 Toolbox by Butter
Waymarks
By Materia Raiding Discord
Phase 1
{"Name":"Imported","MapID":943,"A":{"X":100.0,"Y":0.0,"Z":90.0,"ID":0,"Active":true},"B":{"X":110.0,"Y":0.0,"Z":100.0,"ID":1,"Active":true},"C":{"X":100.0,"Y":0.0,"Z":110.0,"ID":2,"Active":true},"D":{"X":90.0,"Y":0.0,"Z":100.0,"ID":3,"Active":true},"One":{"X":110.0,"Y":0.0,"Z":90.0,"ID":4,"Active":true},"Two":{"X":110.0,"Y":0.0,"Z":110.0,"ID":5,"Active":true},"Three":{"X":90.0,"Y":0.0,"Z":110.0,"ID":6,"Active":true},"Four":{"X":90.0,"Y":0.0,"Z":90.0,"ID":7,"Active":true}}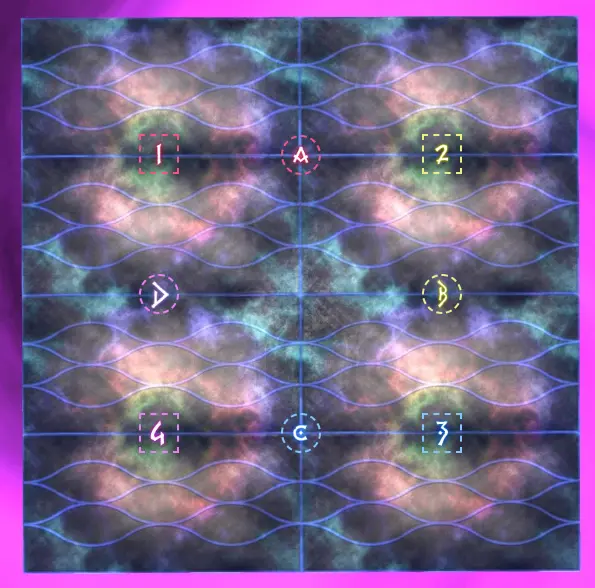
Notes
- All super chain spreads are boss relative
- 2nd Paradeigma is Tether End Point (Player) relative, not Angel relative
- Super Chain Theory I has note to use pair spread for AOE discard location
- 3rd Paradeigma is W to E priority for tanks and healers instead of N to S
- Super Chain Theory IIA uses same side pairs for 1st and 2nd if it is pairs* do not move to other side to pair spread after wing cleave - Can preposition & prevents clipping issues if moving is not synced
Toolbox by Pipiro Piro: https://ff14.toolboxgaming.space/?id=494096636296861&preview=1#1
Phase 2
{"Name":"Imported","MapID":943,"A":{"X":100.0,"Y":0.0,"Z":89.0,"ID":0,"Active":true},"B":{"X":104.0,"Y":0.0,"Z":93.0,"ID":1,"Active":true},"C":{"X":100.0,"Y":0.0,"Z":97.0,"ID":2,"Active":true},"D":{"X":96.0,"Y":0.0,"Z":93.0,"ID":3,"Active":true},"One":{"X":87.0,"Y":0.0,"Z":93.0,"ID":4,"Active":true},"Two":{"X":113.0,"Y":0.0,"Z":93.0,"ID":5,"Active":true},"Three":{"X":92.0,"Y":0.0,"Z":92.0,"ID":6,"Active":true},"Four":{"X":108.0,"Y":0.0,"Z":92.0,"ID":7,"Active":true}}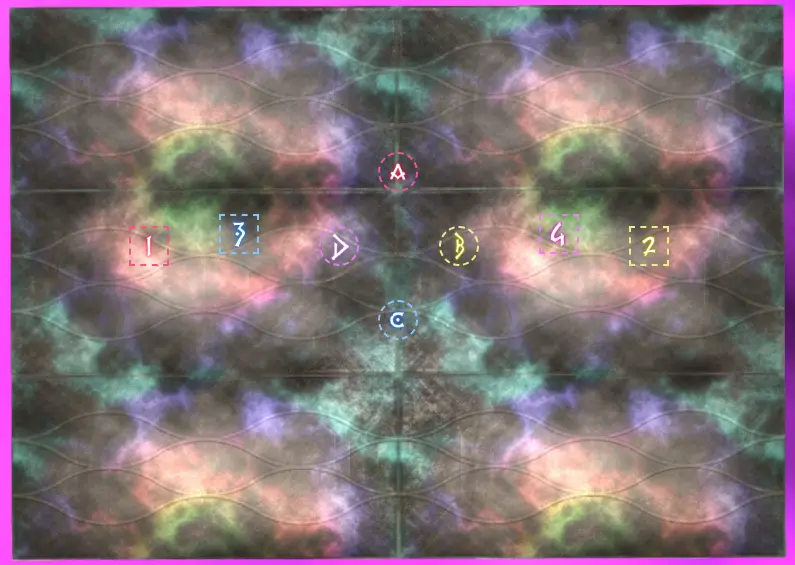
Notes
- Waymarks 3, 4 for protean cleaves during Classical Concepts (stand on corners of waymarks)
- Waymarks 1, 2, A, B, C, D for Caloric Theory 1
- 1, 2 are for Aero
- A, B, C, D are for Fire Pairs
Cheatsheets
By Materia Raiding Discord